Create Cue
This chapter describes how to create a cue.
You can use the export to make a backup copy of the configured cues. This is particularly useful if you want to transfer your cues to a test system or to another company outside your environment.
There is a separate function for exporting and importing cues within your environment. For more information, see the chapter Copying cues to another client.
Note
Permissions required
It is only possible for certain users to create a cue. You must have the BYD CU ADMIN or SUPER permission set. For more information on how to assign the BYD CU ADMIN permission set to a user, refer to the section Assign admin permissions for Beyond Cues.
Note
Automatic font color adjustment
The font color of the cue is automatically selected based on the color of the cue. For example, if you create a black cue, the system will select white font. If the cue color is white, a black cue font will be used accordingly. In this way, the Beyond Cues app ensures optimal readability of the cues.
To create a cue, proceed as follows:
- From the Role Center, open the search (ALT+Q).
- Search for Beyond Cues and click on the corresponding search result.
- The Beyond Cues page is displayed. On this page you will find all configured cues.
- Click New in the menu bar.
- The Cue card is displayed.

- Under the General tab, enter a code for the cue in the Code input field. After entering the code, a preview of the cue is displayed in the lower right area.
- Enter a title for the cue in the Title input field. The preview will be updated to show how the configured cue will appear later in the role center. The title can be translated for different display languages. For more information, see the section Translate cue.
- Under Group Code, select a display group or create a new group. Note that the display group is displayed as a tab on the role center and organizes one or more cues. You can define a translation for the group via the menu bar so that the translation for the display group is used when the display language of the interface is changed. For more information, see the chapter Translate display group.
- Enter a value in the Sorting No. field to define the order of cues within the selected group. You can also define a sort order at the group level.
- You can define the width of the cue using the values in the Width field.
- Under the Update Interval field, enter a time interval in minutes that is used to update the cue.
- Under Cue Color, specify the color for the cue.
- Select a suitable icon for your cue from the available icons.
- Under the Calculation tab, in the Type field, select which cue type you want to create. The following options are available for this:
- Average: The cue should reflect an average (for example, the average of all amounts from sales orders).
- Count: The cue should reflect a number (for example, the number of catalog items or number of customers without a VAT ID).
- Exists: The cue should reflect a yes or no value (for example, check if there are open approvals for an employee).
- Lookup: The cue should provide a filtered view (for example, the sales quotes of a particular employee).
- Sum: The cue should reflect a sum (for example, the sum of the amounts of the sales invoices).
- First Field Value: The cue should show the first value found in the underlying records.
- Last Field Value: The cue should show the last value found in the underlying records.
- Compare: The Cue should compare two field values of a common table and serve as a decision aid/analysis. You can find more information on this in the chapter Cue with Compare Feature.
- Function: The cue should execute a function. As an example, the Beyond Cues range of functions includes a preconfigured cue as standard, which shows you the employee whose birthday is next. At the bottom of the cue, you can scroll to the next employee. You can find more information on this in the chapter Cue with Function Feature.
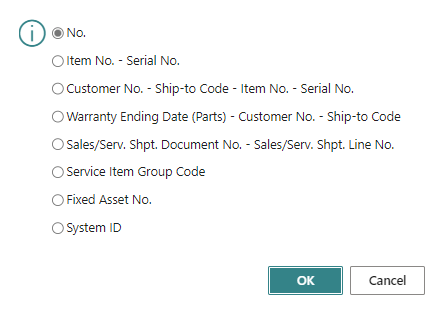
- Under Table name, enter the table you want to use for calculating the cue (e.g. ID 36 for sales header). Click in the field to open the Table Lookup window from which you can select the table.
- In the Table Key field, you can optionally define whether the data should be sorted using an available primary or secondary key. Click on the number in the field to select from the available keys for this table. Specifying a key reduces the loading times of the cue data and thus contributes to better system performance.

- You can use the Descending slider to sort the sort sequence in ascending or descending order using the key.
- Open the drop-down menu for the Table Filter Code field.
- Create a new filter, click on New in the context menu.
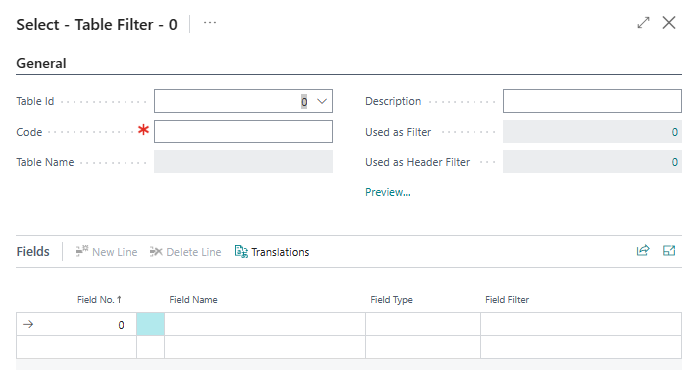
- The Select - Table filter window is displayed.

- Enter a code for the table filter in the Code field.
- Enter a description for the table filter in the Description field.
- Under the Fields section, you can filter by field values that are to be applied to the selected table. In this example, we want to filter by the Quote document type. Click on the drop-down menu under the Field No. column and select the Document Type field (ID: 1) from the list.
- Define the value Quote under the Field Filter column. You can define a translation for the field filter value so that the field filter can also be used when the display language is changed (if you use the Business Central interface in different display languages). You can find further information on this in the chapter Translate Filter Value.
- Add the Status field (ID: 120) as the second filter criterion and enter the value Open as the field filter. In this way, you can now filter for the Open status in addition to the Quote document type.
- Close the Select - Table Filter window and return to the cue card.
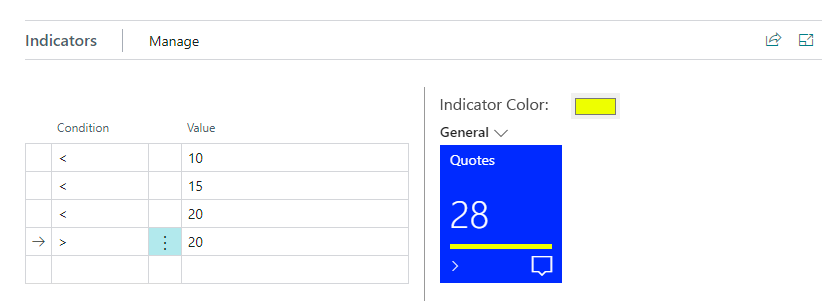
- Under the Indicators tab in the Condition table you can define one or more conditions to set up the indicator of the cue (the horizontal line in the cue). Define the condition(s) and select an indicator color.

You have created a cue. Note that you must assign the cue to users or user groups for it to be displayed in the Role Center. For more information, see the chapter Assign Cues.