Set Up Sharepoint as Cloud Storage
This chapter describes how to connect your Business Central (using Beyond Cloud Connector) to Sharepoint.
Connecting Sharepoint allows you to directly access and edit files stored in the cloud without leaving Business Central.
Note
Adminstator Privileges required in Microsoft Azure
The following descriptions require administrator privileges in Microsoft Azure. To set up the connection, you must have permission to create storage accounts, regsiter apps, add API permissions and create secret keys. If you need help with setup or have any questions in this regard, please feel free to contact us at
info@beyondit.gbmh.
Follow the steps below to connect Sharepoint in Business Central:
- Register application in Microsoft Azure
- Add API permissions
- Prepare access data
- Connect Beyond Cloud Connector with Sharepoint in Business Central
Register application in Microsoft Azure
This section describes how to register the application (Beyond Cloud Connector) in Microsoft Azure.
To do this, proceed as follows:
- Open the website http://www.portal.azure.com/ and log in.
- In the Microsoft Azure menu bar, click App Registrations.

- The App Registrations page is displayed. Click New Registration in the menu bar.
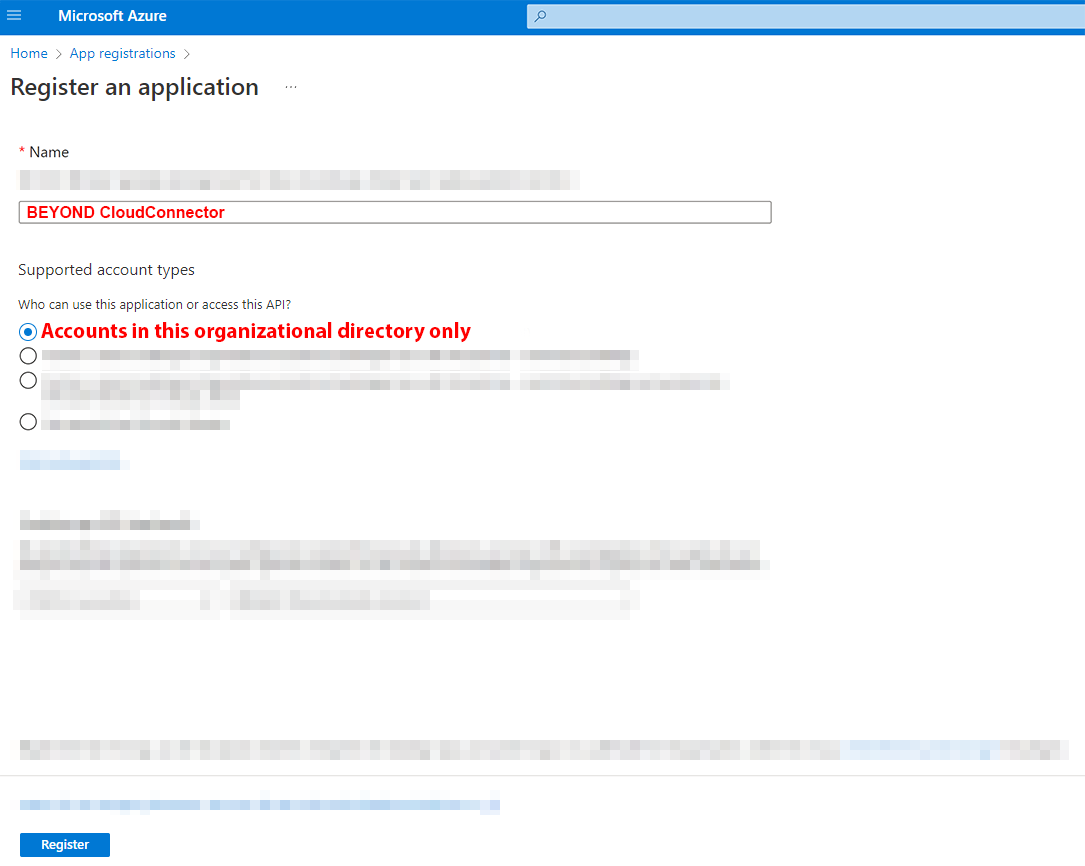
- Enter a suitable name for the new application under Name. We recommend using the name Beyond Cloud Connector.
- Under Supported Account Types, select the Accounts in this organizational directory only option.
- To complete the application registration, click Register.
You have registered a new application in Microsoft Azure. You need to give this registered application (Beyond Cloud Connector) the appropriate API permissions to connect to Business Central, Microsoft Graph and Sharepoint.
Add API permissions
This section describes how to configure the API permissions required for data exchange (Read, Write and Manage). You need to configure permissions for three program interfaces (APIs). The interfaces used are Sharepoint, Dynamics 365 Business Central, and Microsoft Graph.
To add the API permissions, do the following:
- If you have not yet opened the Microsoft Azure web page, click on the link below and log in:
http://www.portal.azure.com/. - In the Microsoft Azure menu bar, click the App Registrations menu item.
- The App Registrations page is displayed.
- In the App Registrations table that is displayed, click the application that you created in the Register application in Microsoft Azure section.
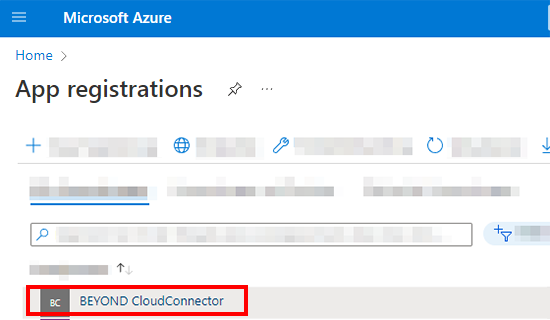
- The corresponding app registration page is displayed.
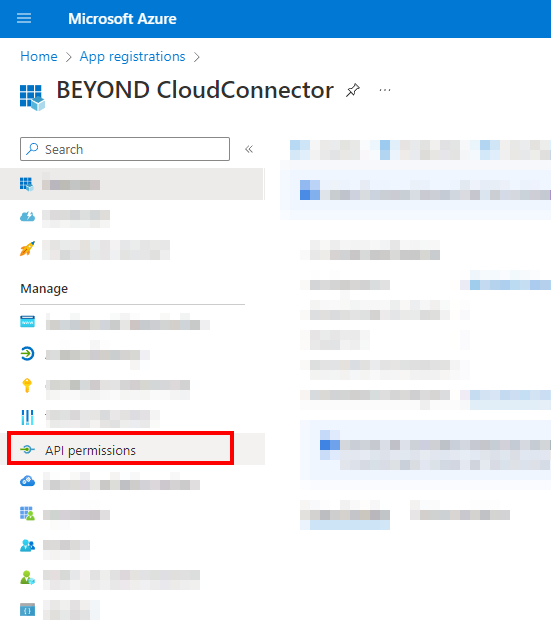
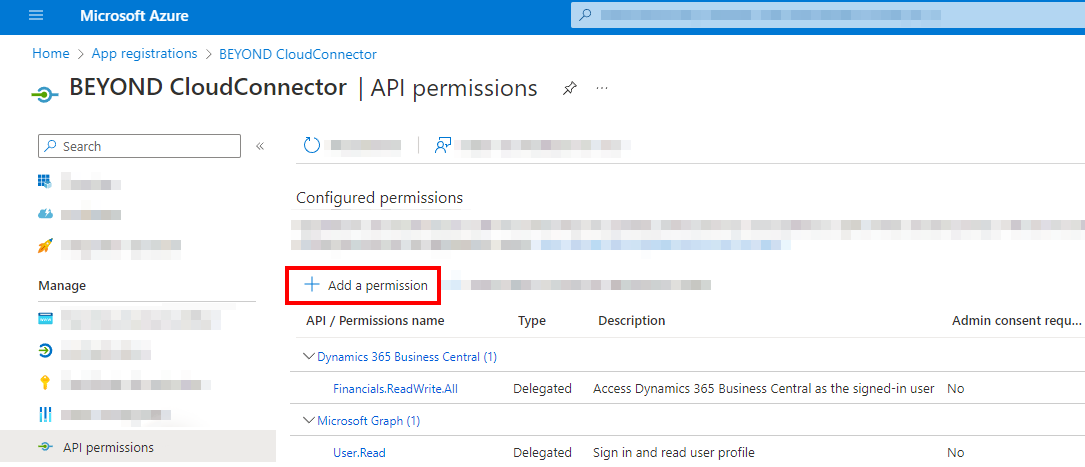
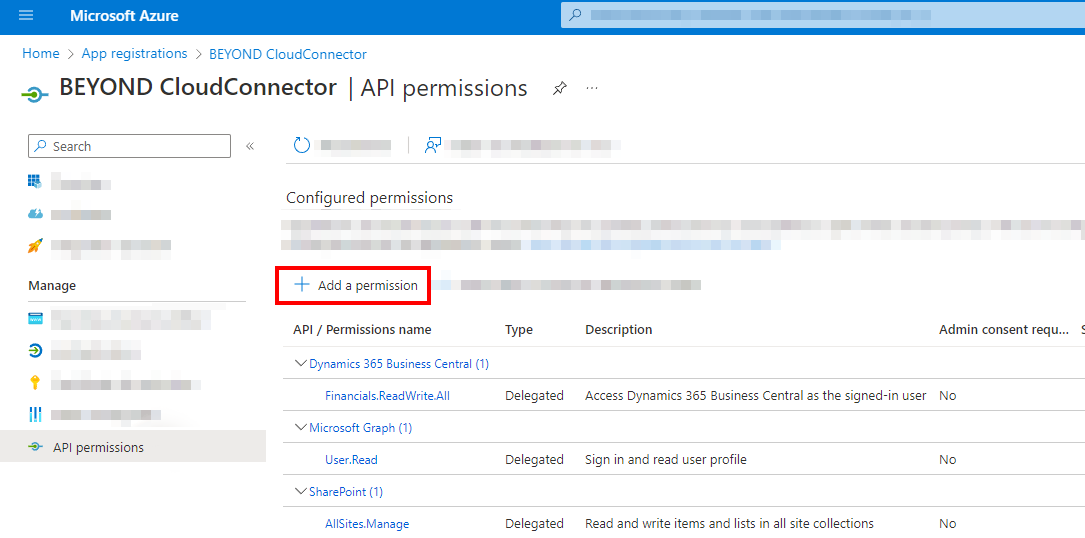
- To view the permissions for the registered app, click API Permissions in the menu.
- To add the permission for Dynamics 365 Business Central, click the Add a Permission option under the Configured Permissions section.
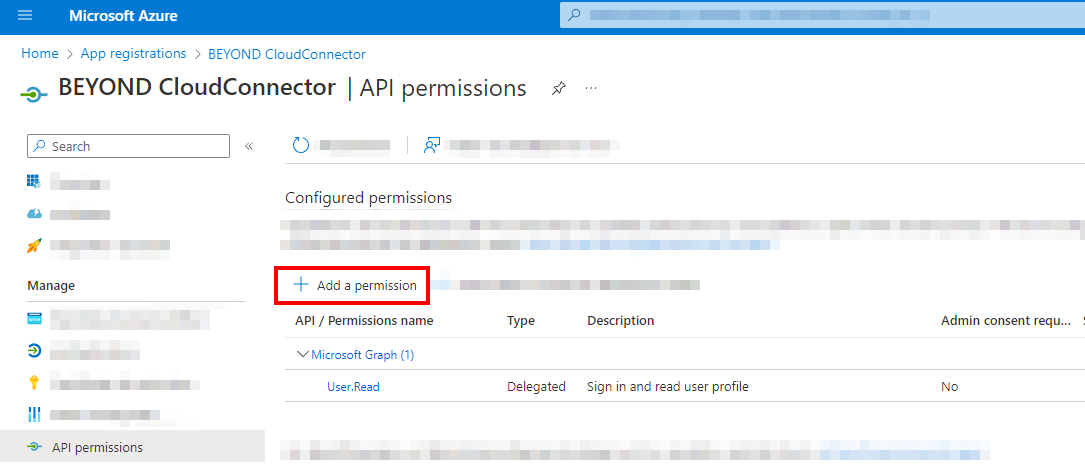
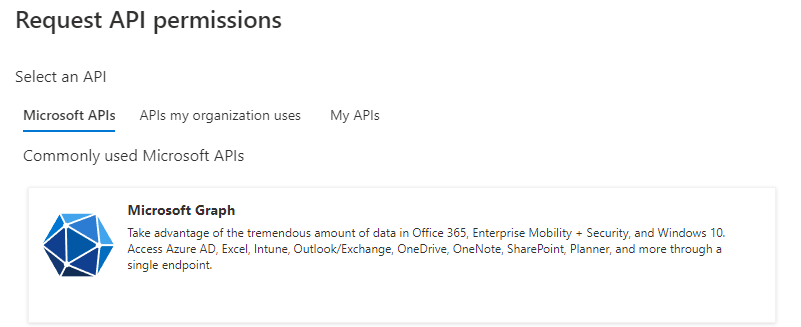
- The Request API Permissions window is displayed.
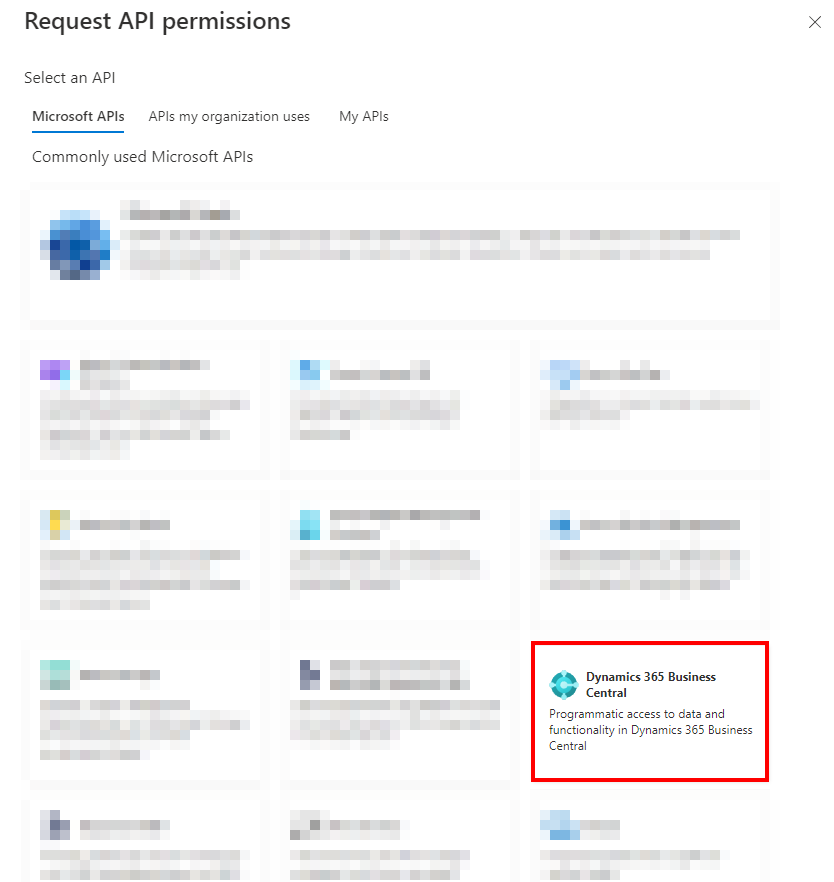
- Select Dynamics 365 Business Central from the available API permission options.
- Choose the permission type Delegated permissions.
- Select the Financials.ReadWrite.All checkbox.
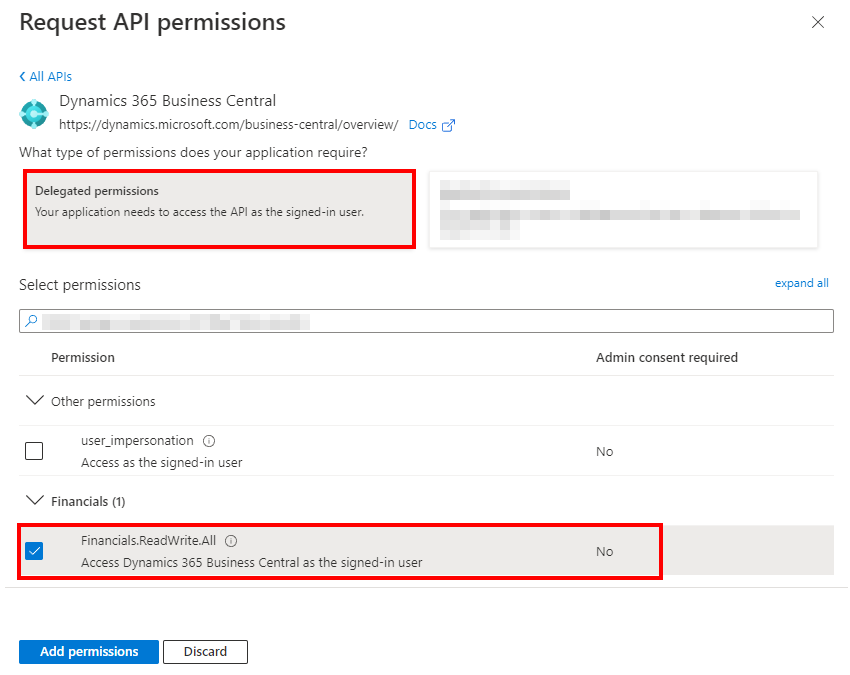
- Click Add Permissions.
- You have granted permission for Dynamics 365 Business Central. This is displayed under the Configured Permissions section in your app registry.
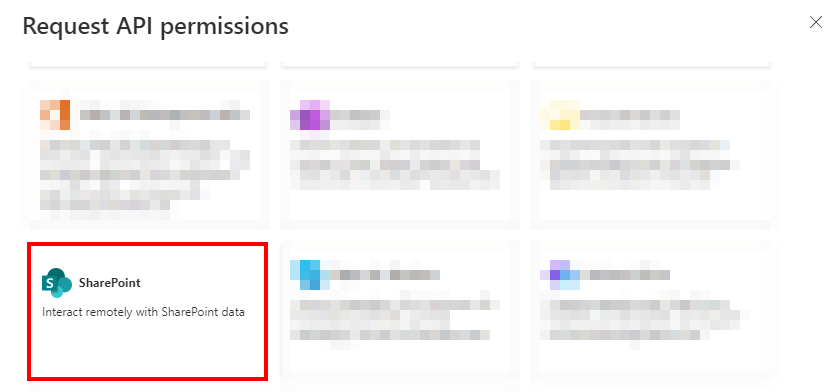
- To add other required permissions (Sharepoint), click Add a Permission in the Configured Permissions area.
- Click on the SharePoint.
- Choose the permission type Delegated permissions.
- Select the AllSites.Manage checkbox.
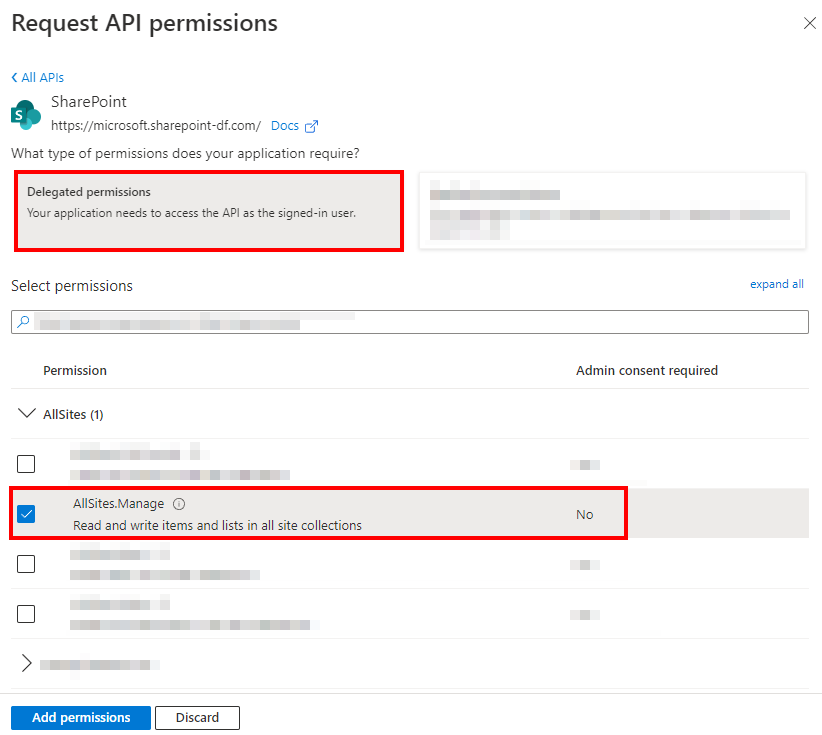
- Click Add Permissions.
- You have granted permission for Sharepoint. Dynamics 365 Business Central and Sharepoint permissions are displayed under the Configured Permissions section in your app registration.
- To add the other required permissions (Microsoft Graph), click Add a Permission in the Configured Permissions area.
- Click on the API Microsoft Graph.
- Choose the permission type Delegated permissions.
- Select the Files.ReadWrite.All checkbox under the Files API Permissions.
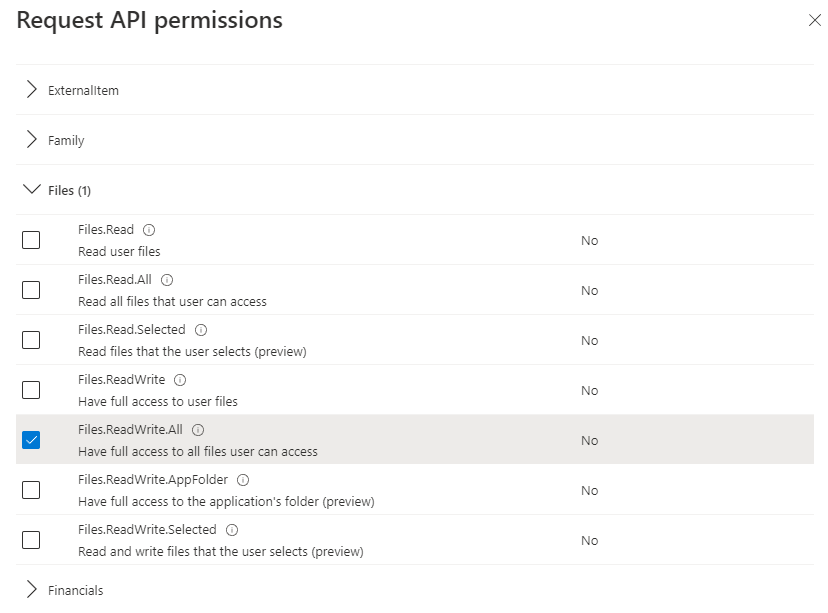
- In addition to the Files.ReadWrite.All permission, scroll down to the Sites permission and select the checkbox for Sites.Read.All.
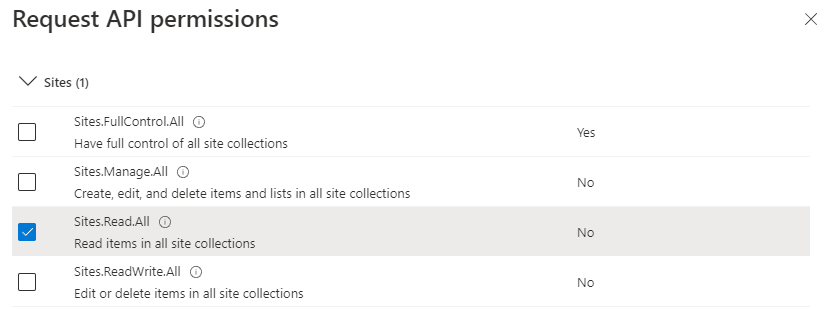
- Click Add Permissions.
- You have granted API permissions for Microsoft Graph.
Dynamics 365 Business Central, Sharepoint, and Microsoft Graph permissions are displayed under the Configured Permissions section in your app registry.
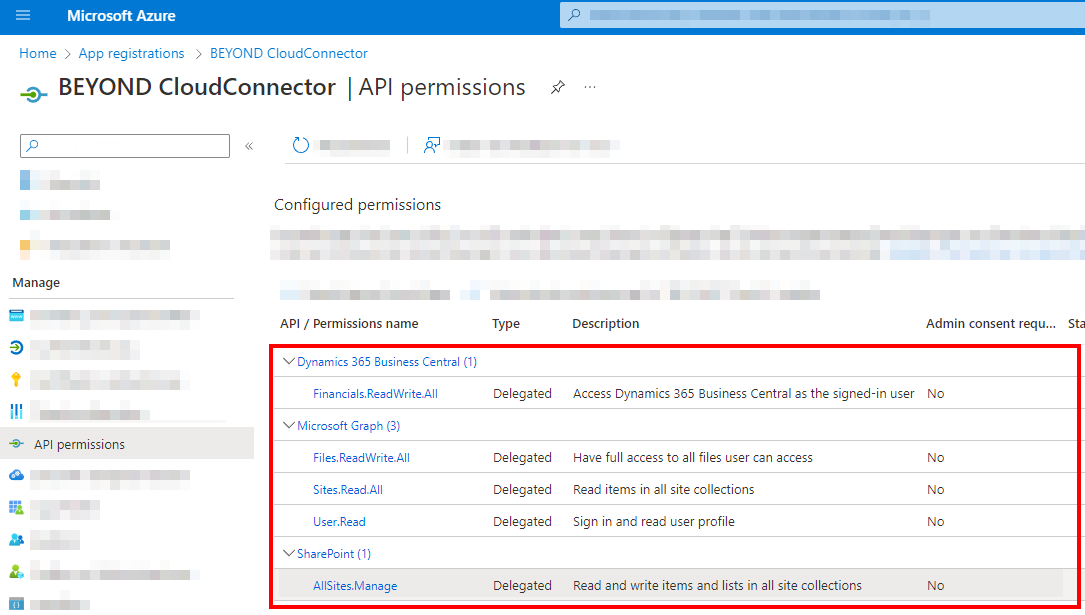
You have added all necessary permissions to connect Sharepoint via Beyond Cloud Connector.
| Dynamics 365 Business Central |
Microsoft Graph |
Sharepoint |
|---|---|---|
| • Financials.ReadWrite.All | • Files.ReadWrite.All | • AllSites.Manage |
| • Sites.Read.All | ||
| • User.Read |
Prepare access data
To make the setup easier for you, we have prepared a PDF file for you. The PDF file caches information from Microsoft Azure (e.g. Application (Client) ID, Access Tokens, etc.) that you will need later for setup in Business Central.
Please download the file from the link below:
Download PDF file
After downloading, open the PDF file and proceed to the following sections:
- Copy Application (Client) ID
- Generate and copy secret
- Copy Authorization URL
- Create and copy Redirect URL
- Copy Application AccessID URL
Copy Application (Client) ID
This subsection describes where to get the Aopplication (Client) ID information for the Beyond Cloud Connector setup in Business Central.
- Open the website for Microsoft Azure http://www.portal.azure.com/ and log in.
- In the Microsoft Azure menu bar, click the App Registrations menu item.
- The App Registrations page is displayed.
- In the App registrations table that is displayed, click the application that you created in the Register application in Microsoft Azure section.
- Click Overview in the menu bar.
- Move the cursor to the Application (Client) ID value. An icon will appear that allows you to copy the value to the clipboard.
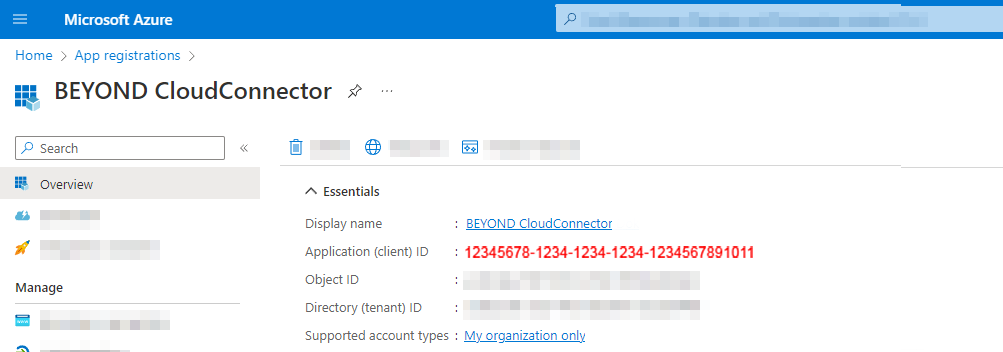
- Insert the value in the PDF file under the Client ID field.
Generate and copy secret
This subsection describes how to create a new secret key in your Microsoft Azure. The secret key (also called Client Secret) is required to secure the connection to Sharepoint and to authenticate yourself.
To generate a secret key, proceed as follows:
- If you have not yet opened the Microsoft Azure web page, click on the link below and log in:
http://www.portal.azure.com/ - In the Microsoft Azure menu bar, click the Certificates & Secrets menu item.
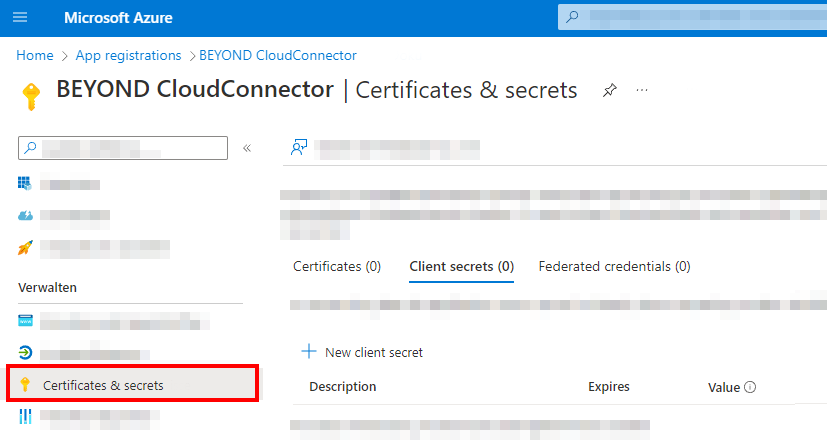
- Select New client Secret from the menu bar.
- Under the Description field, enter a name for the key (for example, Beyond Cloud Connector).
- Under the Expires field, define the validity period of the key. We recommend that you specify the validity period as 12 months. Please note that a new key must be regenerated after this period/date expires.
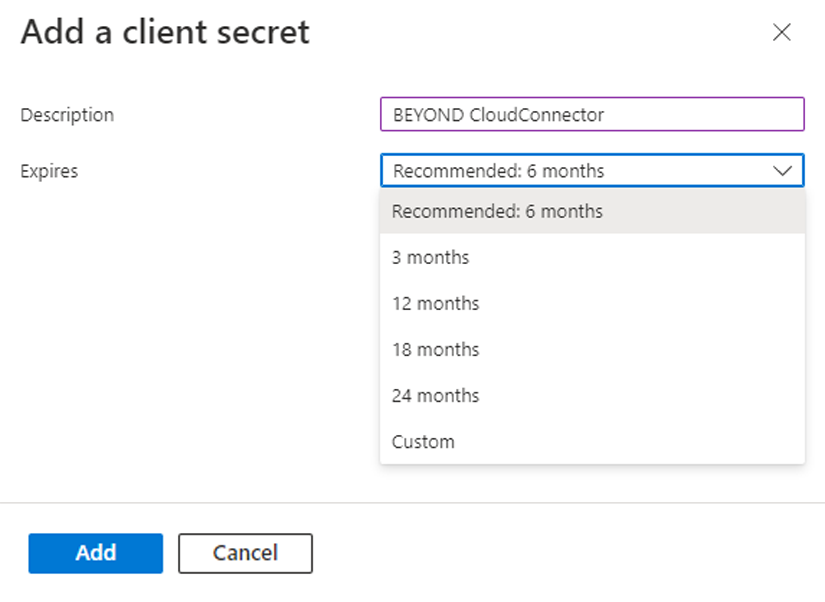
- To create the key, click Add.
- The new secret key (client secret) will be added to the Certificates & Secrets page.

- Move the mouse cursor to the displayed value under the Value column. An icon will appear that allows you to copy the value to the clipboard.
- Copy the value.
- Insert the value in the PDF file under the Client Secret field.
Note
Values of secret keys are displayed only immediately after creation
The displayed value for the secret key is shown only in this session. When the browser window is closed or you log out, the value is made unrecognizable and can no longer be copied. You need the value of the key to connect Sharepoint/Beyond Cloud Connector to Microsoft Dynamics 365 Business Central (see section Connect Beyond Cloud Connector with Sharepoint in Business Central).
Copy Authorization URL
This subsection describes where to get the Authorization URL information for setting up Beyond Cloud Connector in Business Central.
- Open the website for Microsoft Azure http://www.portal.azure.com/ and log in.
- In the Microsoft Azure menu bar, click the App Registrations menu item.
- The App Registrations page is displayed.
- In the App registrations table that is displayed, click the application that you created in the Register application in Microsoft Azure section.
- Click Overview in the menu bar.
- In Microsoft Azure, under the overview for the registered application Beyond Cloud Connector, click Endpoints in the menu bar. The authorization URL is composed of the following components:
https://login.microsoftonline.com/your-directory-id/oauth2/v2.0/authorize
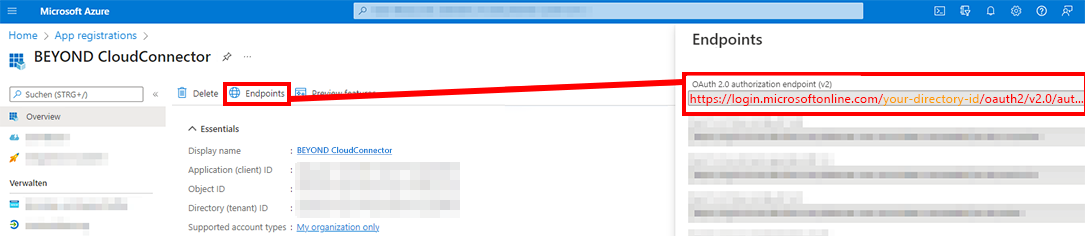
- From Microsoft Azure, copy the field value for OAuth 2.0 authorization endpoint (v2) and paste it into the Authorization URL field in the PDF file.
Create and copy Redirect URL
This subsection describes where to get the Redirect URL information for Beyond Cloud Connector setup in Business Central.
- Open the website for Microsoft Azure http://www.portal.azure.com/ and log in.
- In the Microsoft Azure menu bar, click the App Registrations menu item.
- The App Registrations page is displayed.
- Klicken Sie in der angezeigten Tabelle App-Registrierungen auf die Anwendung, die Sie im Abschnitt Register application in Microsoft Azure erstellt haben.
- Click Authentication in the menu bar.
- Click Add Platform.
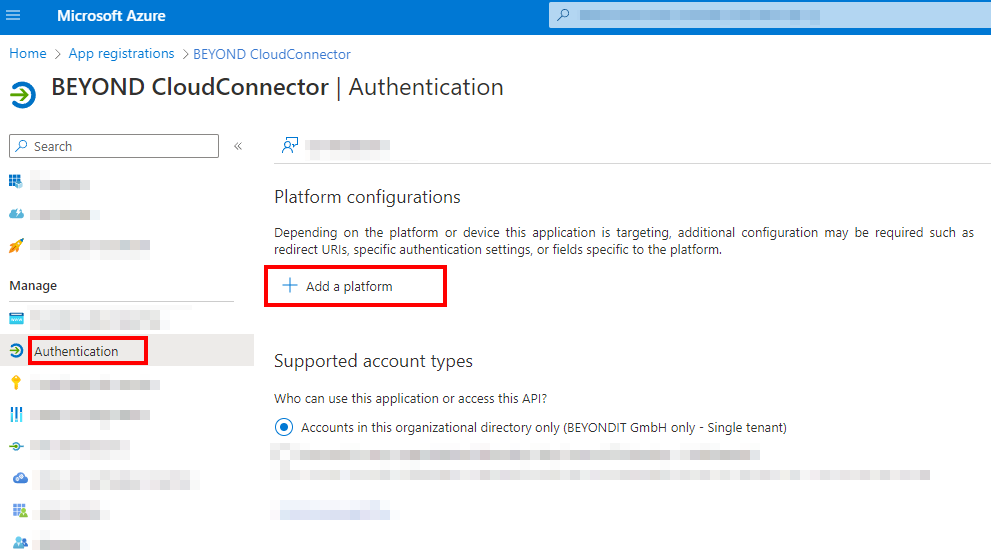
- A window will be displayed. Select Web from the options for the platform.
- Paste the following link in the Redirect URI field. Replace your-directory-id and database-name in the link.
https://businesscentral.dynamics.com/your-directory-id/database-name?page=70838577. - Copy the redirect URL into the PDF file under the Redirect URL field.
- Select the Access Tokens and ID Tokens checkboxes.
- To create the redirect URL, click Configure.

Copy Access Token URL
This subsection describes where to get the Access token URL information for Beyond Cloud Connector setup in Business Central.
- Open the website for Microsoft Azure http://www.portal.azure.com/ and log in.
- In the Microsoft Azure menu bar, click the App Registrations menu item.
- The App Registrations page is displayed.
- In the App registrations table that appears, click the application that you created in the Register application in Microsoft Azure section.
- Click Overview in the menu bar.
- In Microsoft Azure, under the overview of the registered application Beyond Cloud Connector, click Endpoints in the menu bar. The access token URL is composed of the following components:
https://login.microsoftonline.com/your-directory-id/oauth2/v2.0/token
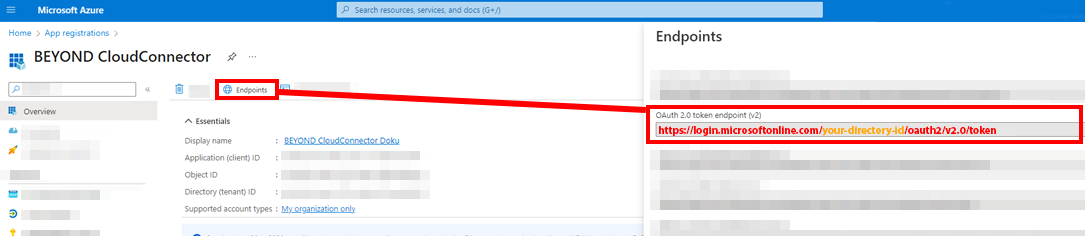
- From Microsoft Azure, copy the field value for OAuth 2.0 token endpoint (v2) and paste it into the Access token URL field in the PDF file.
Note
Ressource URL
The Ressource URL is automatically added by the system when creating the cloud application.
Connect Beyond Cloud Connector with Sharepoint in Business Central
This section describes how to connect Sharepoint to Microsoft Business Central using Beyond Cloud Connector.
To connect Sharepoint via the Beyond Cloud Connector extension in Microsoft Dynamics 365 Business Central, proceed as follows:
- Open your Business Central and the PDF file with the collected data.
- From the role center, open the search function (ALT+Q) 🔍.
- Search for the Cloud Applications page and click the corresponding search result.
- The Cloud Applications page is displayed.
- To connect Sharepoint to your Business Central, click New in the menu bar.
- The Cloud Application page is displayed.
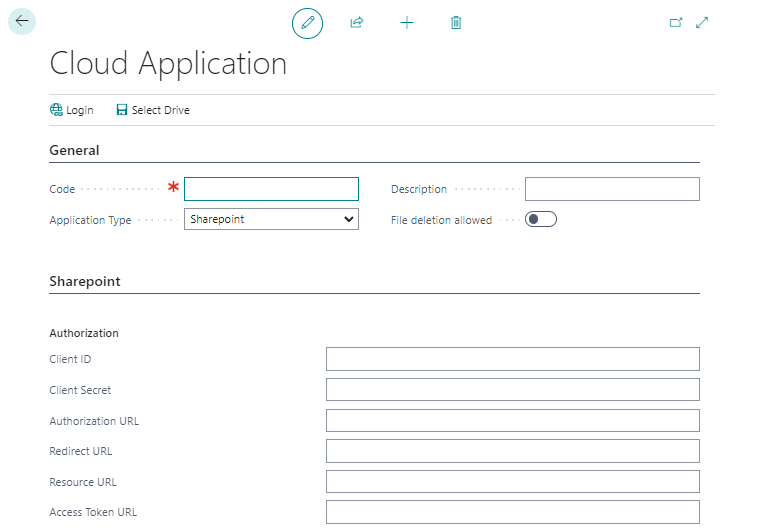
- In the Code field, specify the value Sharepoint.
- The information Resource URL is automatically added by the system.
- In the Application type field, select Sharepoint from the drop-down menu.
- In the Description field, you can enter a description for the new cloud application.
- Use the File Deletion Allowed slider to control whether files stored in the cloud can be deleted via Business Central.
- Open the PDF file with the saved data. You have already collected the information for the setup in the Prepare access data section.
- Copy the data from the PDF file and paste it on the Cloud Application page under the Sharepoint tab.
- When you are done with entering the data, click Select Drive from the menu bar.
- A window is displayed. Select the Sharepoint website (document libary in Sharepoint) which you want to connect to.
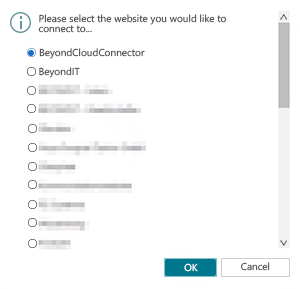
- Click OK.
You have connected your Sharepoint to Microsoft Dynamics 365 Business Central.
For a complete setup, you still need to define the tables on which you want the dropzones to be displayed for storing files from Business Central in Sharepoint. For more information on how to set up dropzones, see the Set up dropzone chapter.
You can also set up automatic report archiving. For more information, see the chapter Set up report archiving.