Setup Report
This chapter describes how to set up a report. Beyond ReportsV2 offers you a wide range of content and layout options that you can use to design your reports.
Note
To customize reports quickly and easily, we recommend that you open the report preview (on the Report Setups page) in a separate browser window. If you change the report design, you can then track the change to the report at any time by clicking on the Refresh button.
Note
Info
Beyond ReportsV2 has been programmed to allow you to customize reports and report content without additional developer effort. You can reset these changes back to the default settings at any time. For more information, please refer to the chapter Reset Report Setup.
The contents of this chapter are divided into the following sections:
- Define Print Settings
- Edit Report Address Format
- Add Field to Report
- Add Related Field to Report
- Move Field in Report
- Edit Field Caption
- Add Translation for Field Caption
- Hide Field Caption
- Define Condition for Field
- Add Text Line to Report
- Add Placeholder to Text Line
- Add Translation for Text Line
- Add Seasonal Text to Report
- Add Rich Text to Report
Define Print Settings
This section describes how you can define the print settings for a report.
To define the print settings for a report, proceed as follows:
- Open the search function from the role center (ALT+Q).
- Search for Report Setups and click on the corresponding search result.
- The Report Setups page is displayed.
- Select the relevant report from the list and click on the value under the ID column in the report line.
- The report card is displayed.

- Under the Print Settings tab, you can make the following print settings for the report header:
- Font: In this field you define which font is to be used in the report.
- Font Size: In this field you define the size of the font.
- Page Number: In this field, you specify whether a page number should be printed in the report and if so, where it should be printed.
- Signature Area: In this field, you specify whether a signature area should be printed in the report.
- VAT Specification: In this field, you specify whether the VAT specification should be printed in the report.
- Under the Print Settings tab, you can make the following print settings for the report lines:
- Position No.: In this field, you specify whether position numbers are to be printed in the report.
- Increase Position No.: In this field, you define how position numbers are to be incremented.
- Item No.: In this field you specify whether item numbers are to be printed.
- Lines without Quantity: In this field you specify whether item lines without quantity should be printed in the report.
- Prices: In this field, you specify whether or not prices should be printed in the report. Activate this option, for example, if you do not want to communicate prices to the report recipient or if item prices are irrelevant for the report.
You have edited the print settings for the report. Please note that the font in particular can be overwritten by field-specific settings. For more information on fields in the report, see Add Field to Report.
Edit Report Address Format
This section describes how you can edit the address format.
To edit the address format for a report, proceed as follows:
- Open the search function from the role center (ALT+Q).
- Search for Report Setups and click on the corresponding search result.
- The Report Setups page is displayed.
- Select one of the available reports from the list and click on the value under the ID column in the report line.
- The report card is displayed.
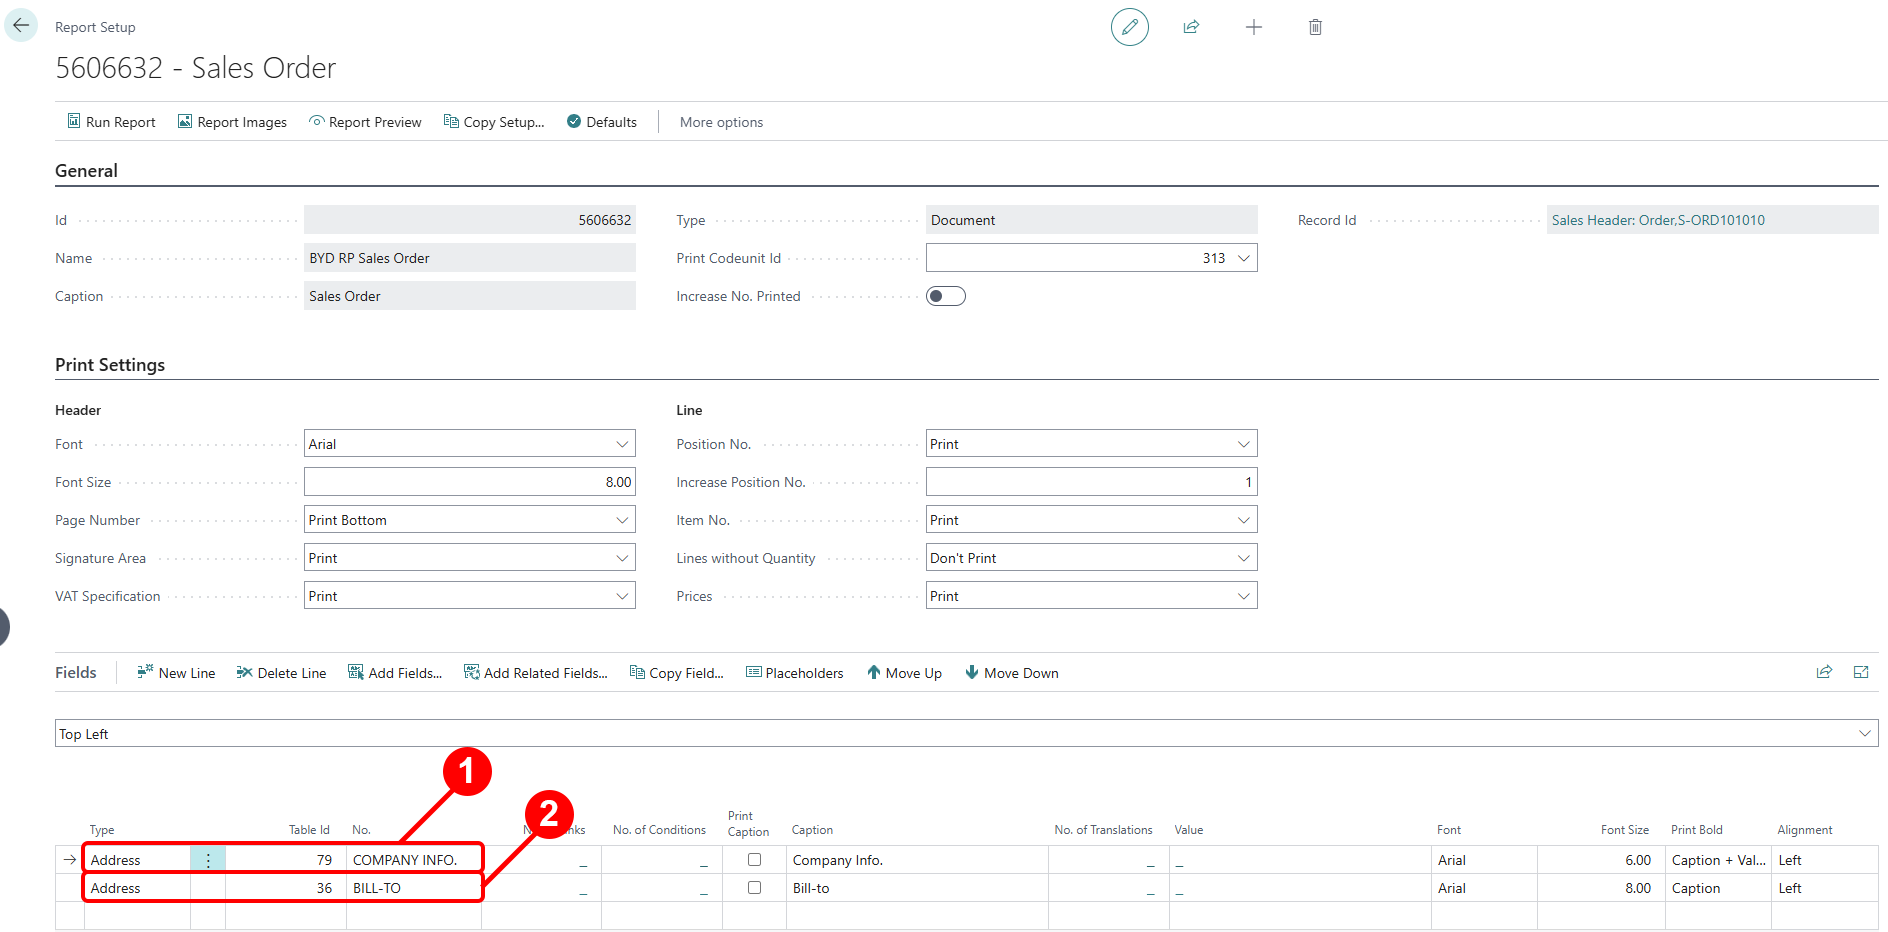
- Scroll down to the Fields tab.
- In the dropdown menu for the layout area, select the value Top Left.
- In the list for the Top Left layout area, there are two lines of the type Address. The two address lines control the content and the display of the addresses on the report.
- You can edit the font style, font size and font on the right-hand side of the corresponding line. To edit the printed content in the address fields, click on the value in the No. column in the corresponding line under the Fields tab. Open the dropdown menu and click on the Show Details option.
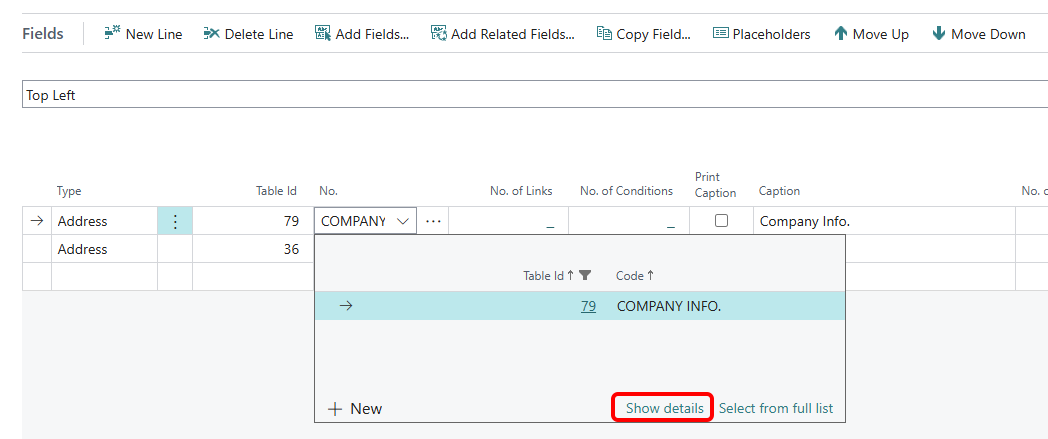
- The Report Address Formats window is displayed.
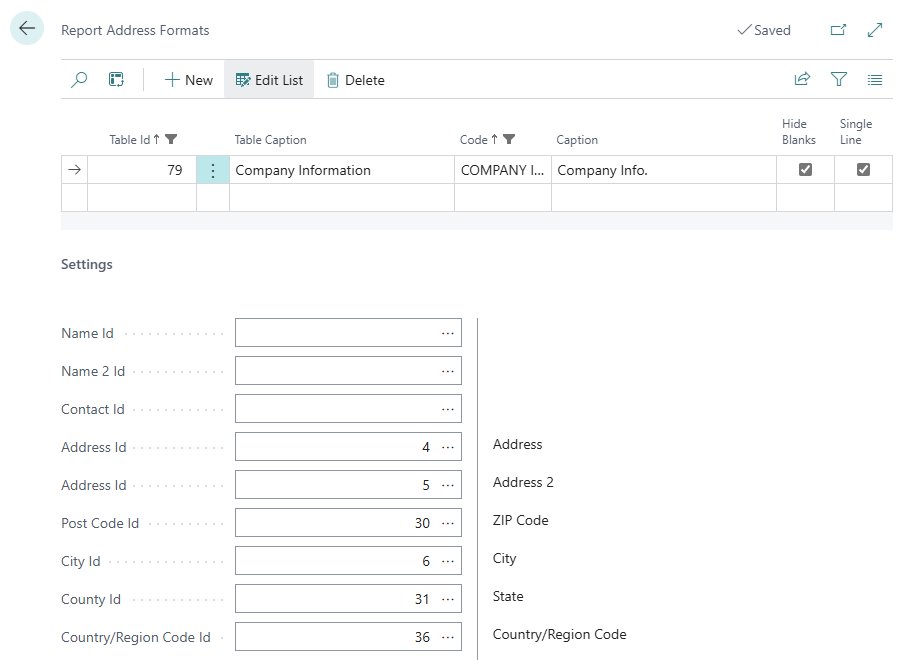
- A configuration is already defined by default on the Report Address Formats page.
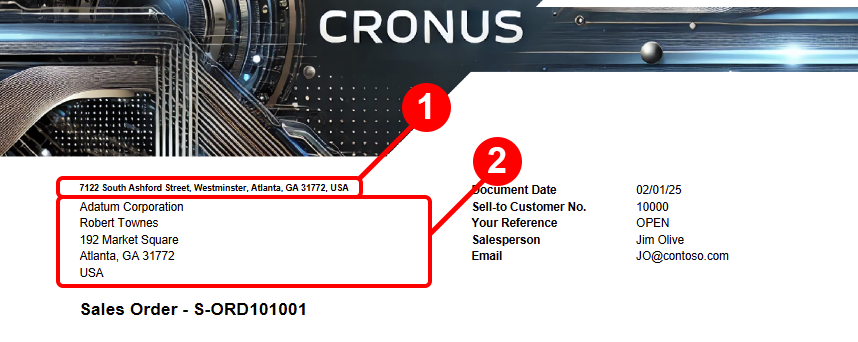
- If you want to include additional information, such as the company name in the address area (1), open the dropdown menu under the Name ID field and select the Name value from the Fields Lookup.
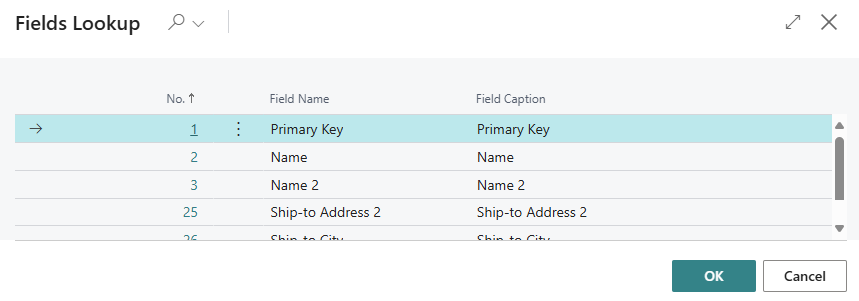
- To apply the change and add the name of your company to the address field, click OK.
- The window is closed and the selected value is transferred to the Name ID field.
- To close the Report address formats window and return to the Report settings page, press the ESC key on the keyboard.

Note
Info
Please note that the report you want to use must be activated in your Business Central. For more information on how to deactivate the standard report from Business Central and activate the reports from Beyond ReportsV2, please refer to the chapter Activate Reports.
You have edited the address line. For more information on how to add a new field with a field value to a layout area, see the section Add Field to Report.
Beyond ReportsV2 also allows you to reference field values that are related to the source field (Salesperson Code -> Salesperson Name). For more information on how to add a related field to a report, see the section Add Related Field to Report.
Add Field to Report
This section describes how to add a field to a report. Beyond ReportsV2 allows you to add new fields with their corresponding field value as well as related fields and their field value to the report. For more information on related fields, see the section Add Related Field to Report.
To add a field to a report, proceed as follows:
- Open the search function from the role center (ALT+Q).
- Search for Report Setups and click on the corresponding search result.
- The Report Setups page is displayed.
- Select the relevant report from the list and click on the value under the ID column in the report line.
- The report card is displayed.
- Under the Fields tab, select the layout area to which you want to add the field. In the following screenshot, you can identify the individual layout areas by number.
- 1: Top Left: This layout area is located at the top left of the report and is primarily used as the address area. For more information on setting the address, please refer to the section Edit Report Address Format.
- 2: Top Right: *This layout area is located at the top right of the report and is primarily used to display additional information relevant to the report.
- 3: Top: *This layout area is located in the report below the address area and the report information.
- 4: Top Columns: **This layout area is located in the report above the column headers for the report lines.
- 5: Before Lines: *This layout area is located before all report lines.
- 6: Before Line: This layout area is located before each report line. Please note that this layout area is repeated per line.
- 7: After Line: This layout area is located after each report line. Please note that this layout area is repeated per line.
- 8: After Lines: This layout area is located after all report lines.
- 9: Bottom: This layout area is located at the bottom of the report.
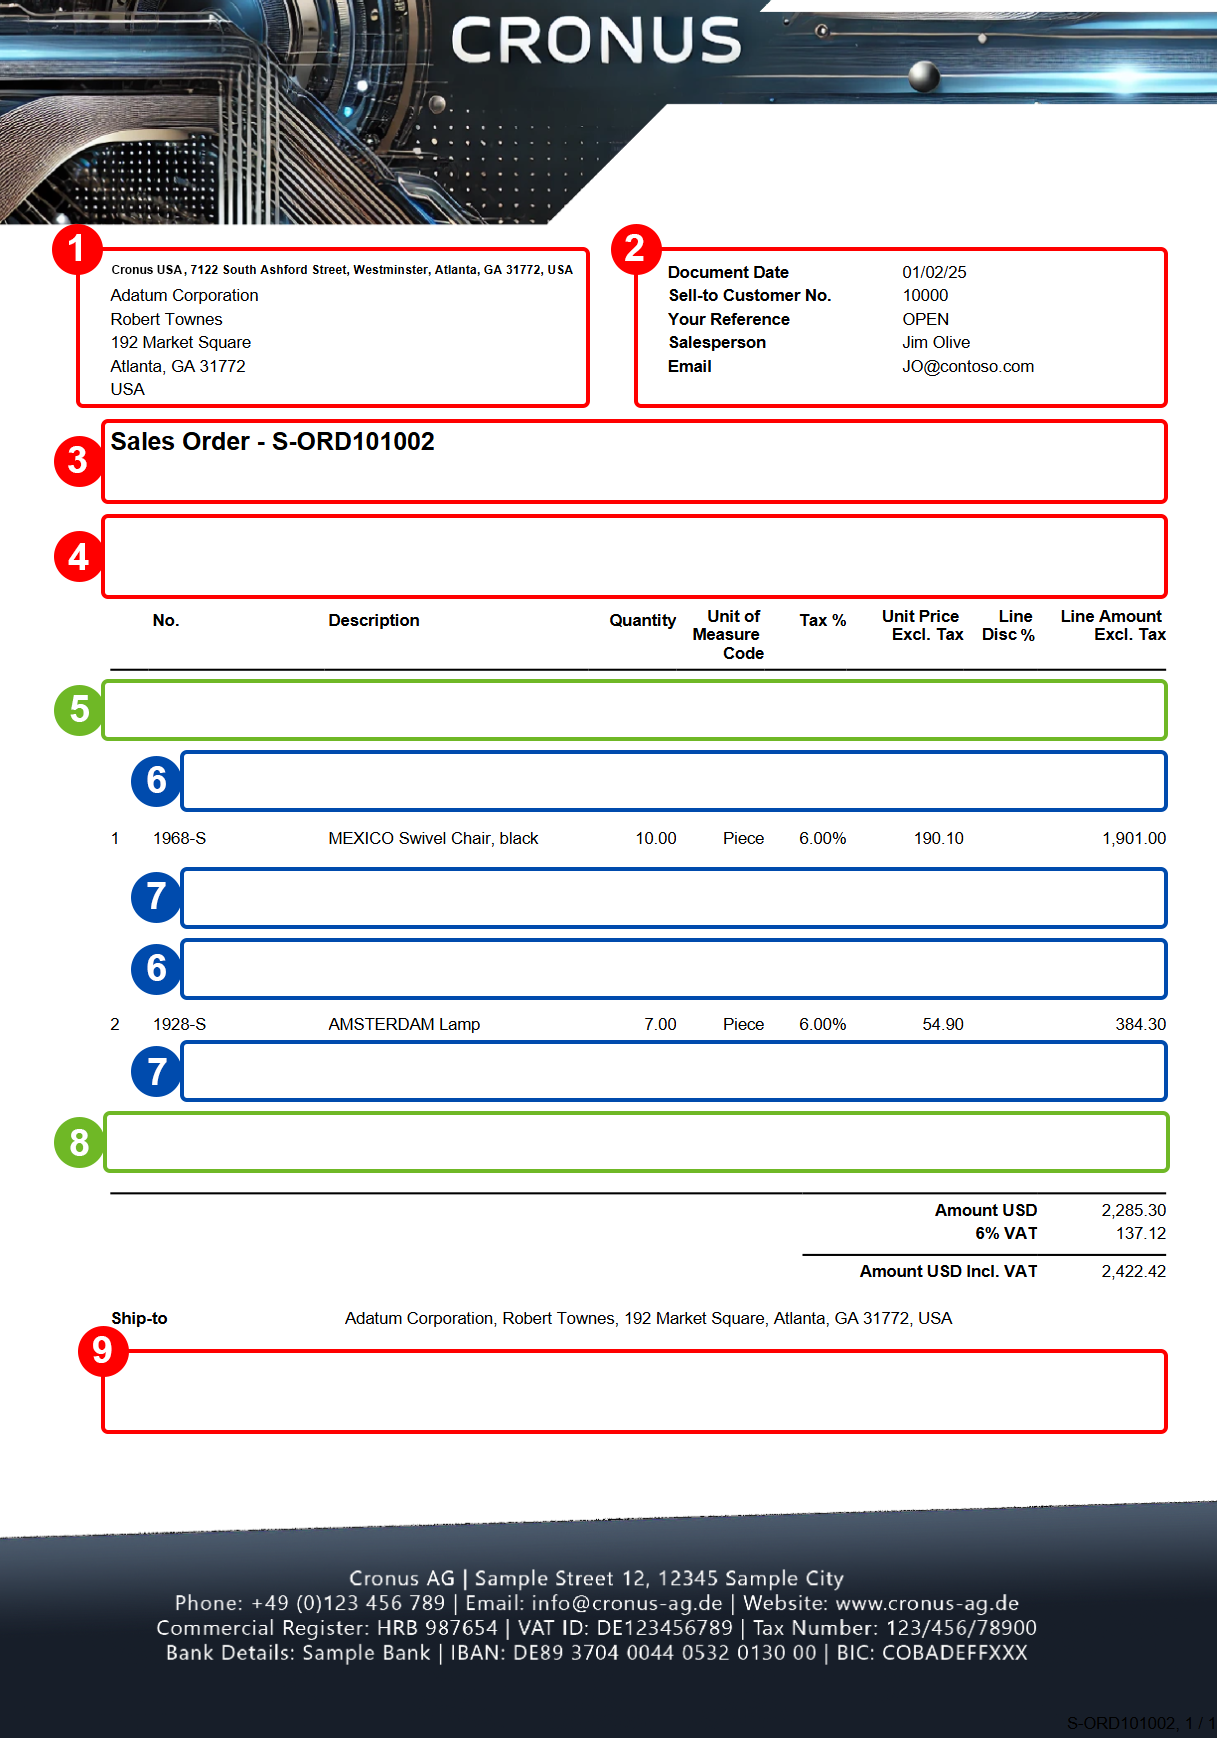
Other selectable areas such as Line, Totals and VAT Specification are reserved by the system and cannot be edited. If you want to hide the VAT Specification report area, you will find the corresponding setting in the Define Print Settings section.
- In our example, we select the layout area Top Right (2).
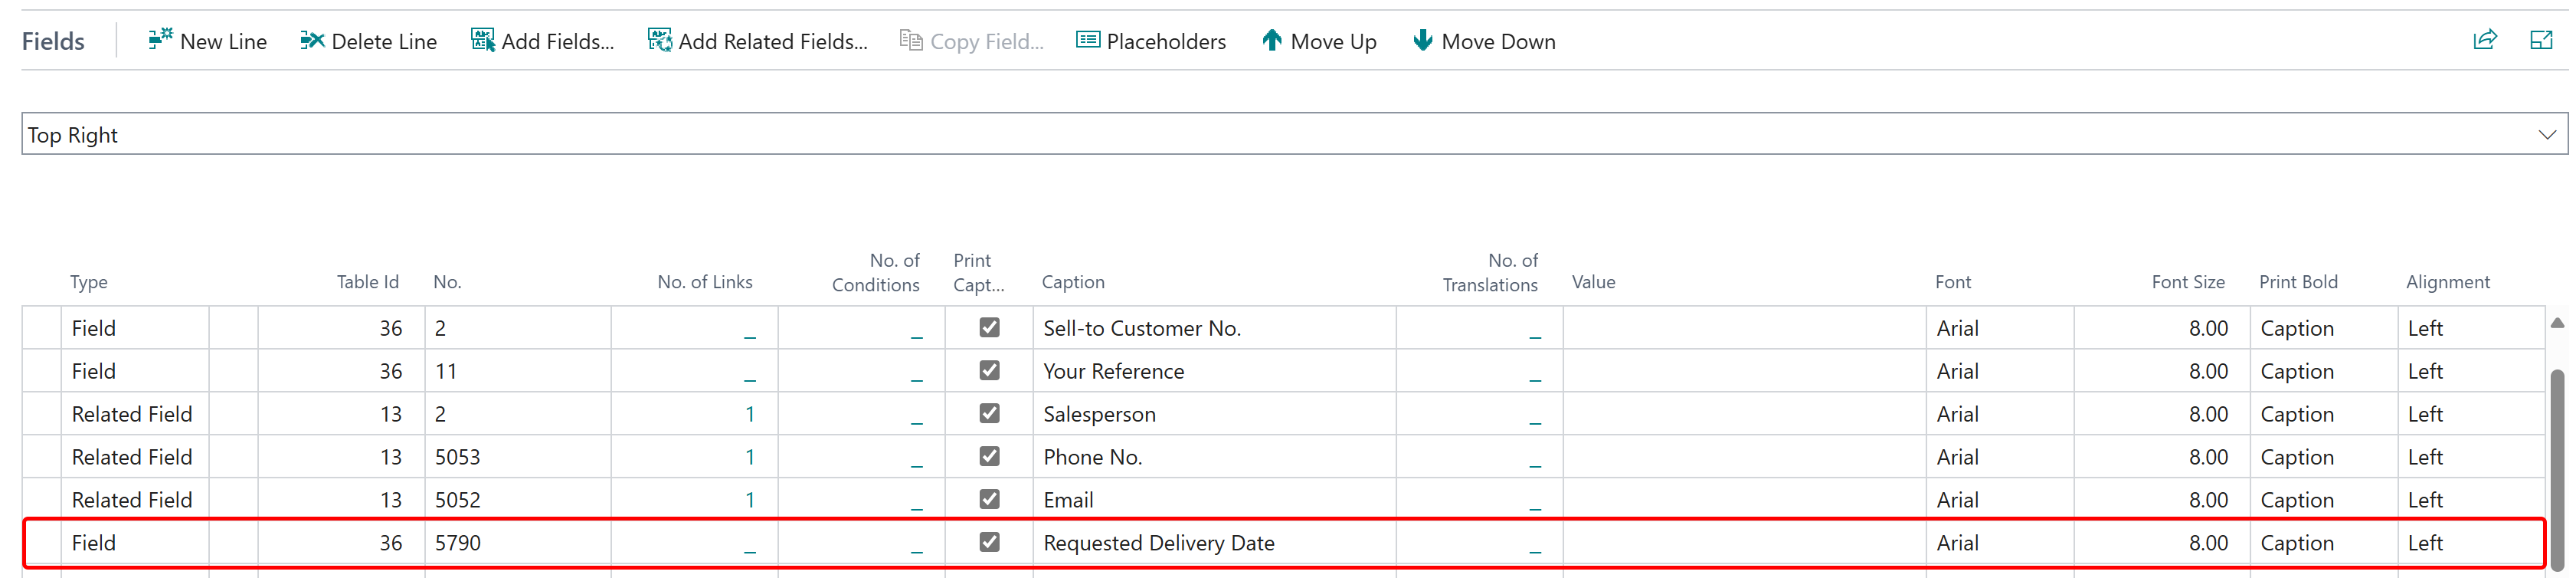
- Click on the Add Fields option under the Fields section in the menu bar.
- The Fields Lookup window is displayed.
- From the list of available fields, select the field you want to add to the report. In our example, we add the field Requested Delivery Date (ID: 5790).
- The Requested Delivery Date field is added in the Top Right (2) list area of the report.
[!INOTE]
Please note that fields are only printed in the report if they have a field value. If fields that you add do not have a field value, they will not be printed in the report. If the field is not printed, you must maintain the data and enter a field value.
You have added a field to the report. In the corresponding line under the Fields section, you will find additional settings for formatting the field and the field value.
[!INOTE]
Please note that changes to the formatting in the Fields area override the general print settings, i.e. if you make a change in the Font, Font Size, Print Bold and Alignment columns for this line, this will only affect this line.
For more information on how to change the field caption in a report, see the section Edit Field Caption.
Add Related Field to Report
This section describes how to add one or more related fields to a report. The difference between a field and a related field is that with a related field, you are referencing a field value in a report that is not included in the corresponding report table by default. This description illustrates how to add the Salesperson Code field to the report and reference the field value/information associated with this code from another table instead of the value (for example DH). For example, this could be the salesperson's name, the salesperson's specific phone number and/or the salesperson's email address.
To add a related field to a report, proceed as follows:
- Open the search function from the role center (ALT+Q).
- Search for Report Setups and click on the corresponding search result.
- The Report Setups page is displayed.
- Select the corresponding report in the list and click on the value under the ID column in the report line.
- The report card is displayed.
- Under the Fields tab, select the layout area to which you want to add the related field. In the following illustration, you can identify the individual areas by number.
- 1: Top Left: This layout area is located at the top left of the report and is primarily used as the address area. For more information on setting the address, please refer to the section Edit Report Address Format.
- 2: Top Right: *This layout area is located at the top right of the report and is primarily used to display additional information relevant to the report.
- 3: Top: *This layout area is located in the report below the address area and the report information.
- 4: Top Columns: **This layout area is located in the report above the column headers for the report lines.
- 5: Before Lines: *This layout area is located before all report lines.
- 6: Before Line: This layout area is located before each report line. Please note that this layout area is repeated per line.
- 7: After Line: This layout area is located after each report line. Please note that this layout area is repeated per line.
- 8: After Lines: This layout area is located after all report lines.
- 9: Bottom: This layout area is located at the bottom of the report.
Other selectable areas such as Line, Totals and VAT Specification are reserved by the system and cannot be edited. If you want to hide the VAT Specification report area, you will find the corresponding setting in the Define Print Settings section.
- In our example, we select the layout area Top Right (2).
- Click on the Add Related Fields option under the Fields section in the menu bar.
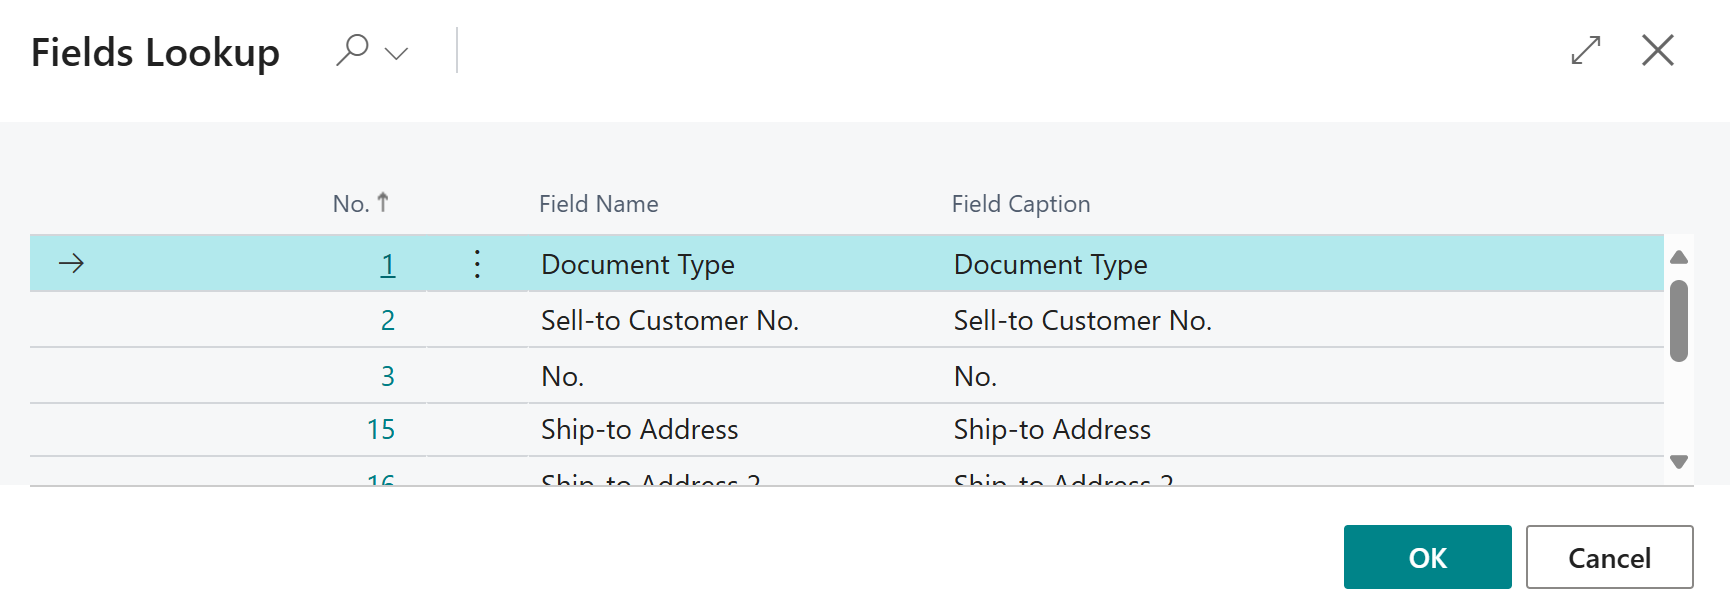
- The Field Lookup window is displayed.
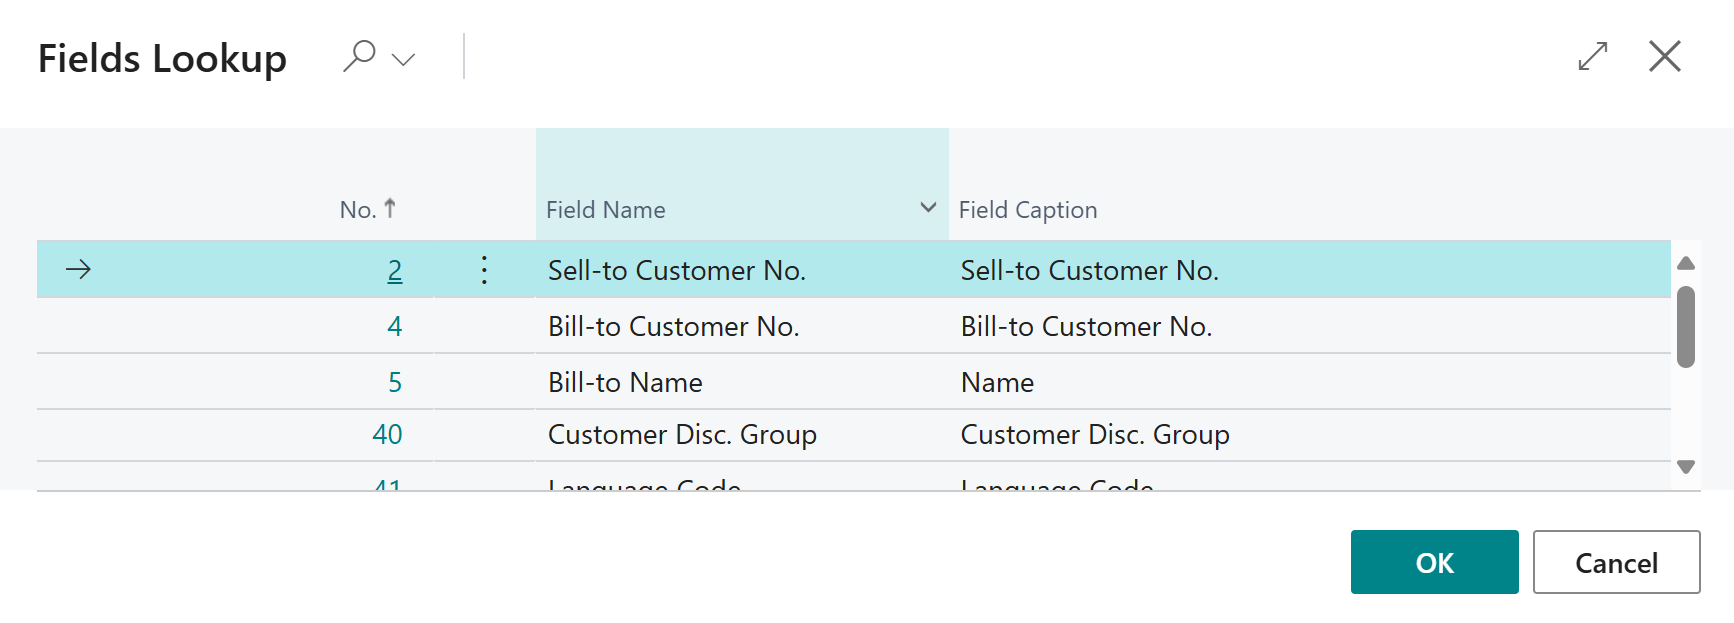
- From the list of available related fields, select the field you want to add to the report. In our example, we add the related field Salesperson Code (ID: 43). You can use the search to find corresponding fields from the list.

- Confirm the selection with OK.
- The Salesperson Code field is added in the Top Right (2) list area of the report. Note that the table ID in this case is not 36 (ID for the Sales Header table) but 13 (ID for the Salesperson/Purchaser table).
- Click on the value under the No. column and select the ellipsis (…).
- The Fields Lookup window is displayed.
- Select the value Name (ID: 2). This defines that you want to add the value of the linked field Name from the table 13 (Salesperson/Purchaser) to the report for the field value Salesperson Code.
- The line for the related field is updated to the list area of the report setup and displays the corresponding selection. You can use the adjacent Conditions column to define conditions under which this field is printed (for example, that the related fields or fields in general should only be printed in the report if a certain condition is met). Further information on this can be found in the section Define Condition for Field.
- You have added a related field to the report. In the corresponding line under the Fields section, you will find additional settings for formatting the field and the field value.
[!INOTE]
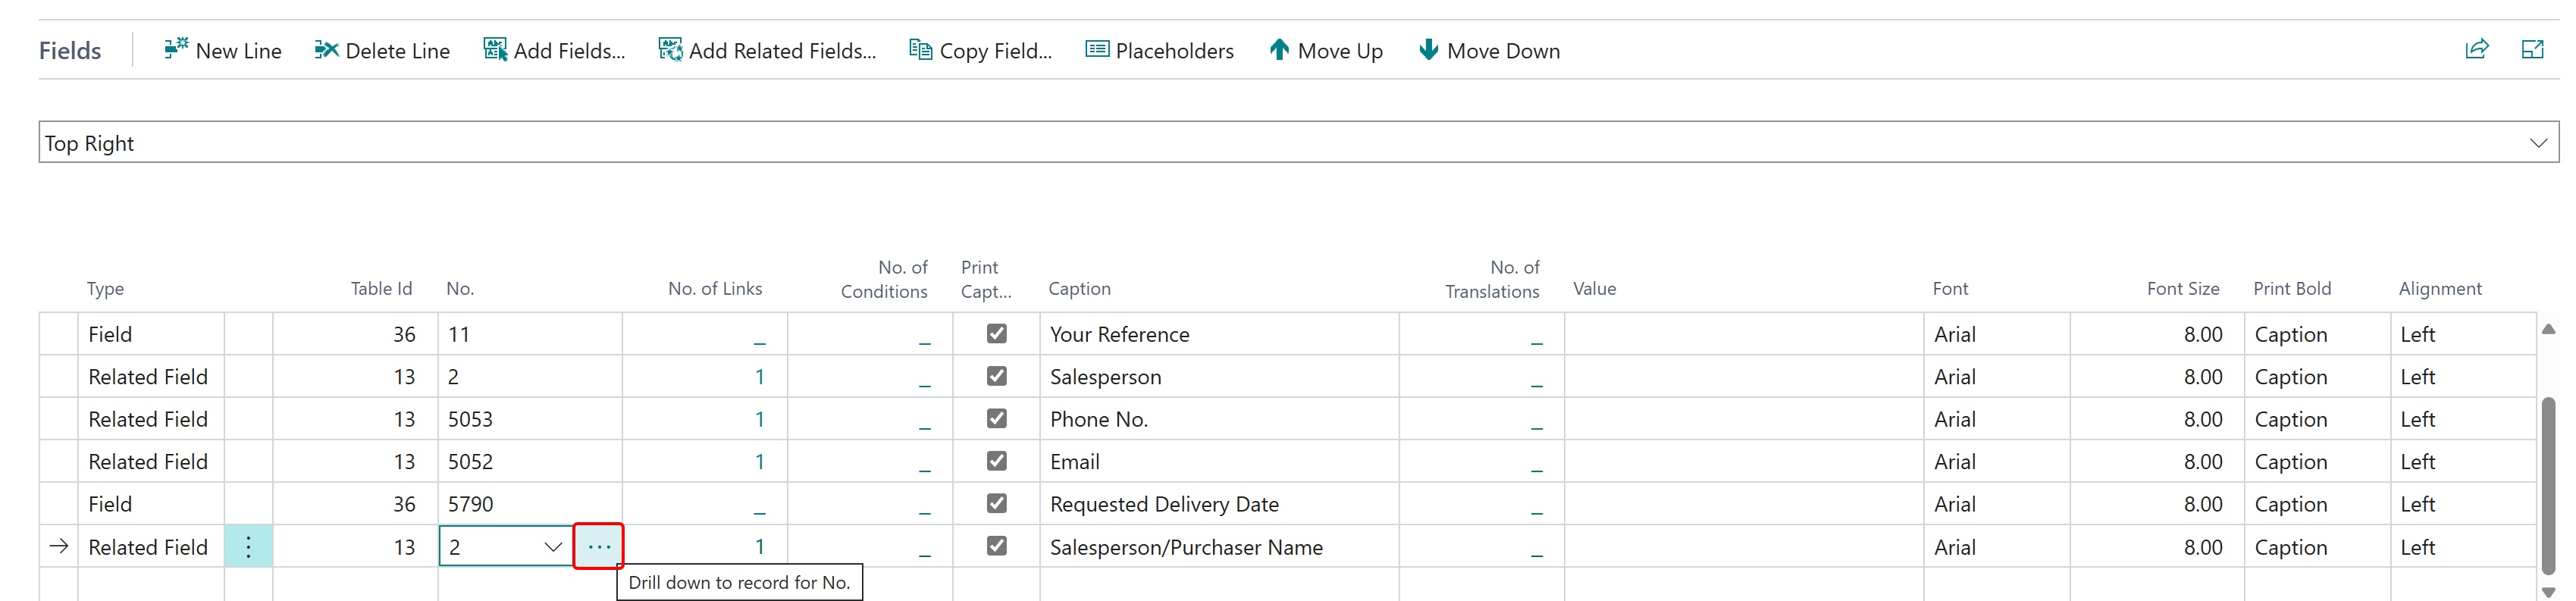
Please note that changes to the formatting in the Fields area override the general print settings, i.e. if you make a change to the Font, Font size, Print Bold and Alignment columns for this line, this will only affect this line. - To add the phone number of the corresponding salesperson in the report in the same way, click on the Add Related Fields option in the menu bar.
- In the Fields Lookup window, select the Salesperson Code field (ID: 43). You can use the search function to find the field more quickly in the list.
- Click OK to add the field to the list.
- Under the newly added line, click on the Fields tab in the No. column and change the value to 5053 (Field: Phone No.).
- To add the email address of the corresponding salesperson in the report in the same way, click on the Add Linked Fields option in the menu bar.
- In the Fields Lookup window, select the Salesperson Code field (ID: 43). You can use the search function to find the field more quickly in the list.
- Click OK to add the field to the list.
- Under the newly added line under the Fields tab, click in the No. column and change the value to 5052 (Field: Email).
[!INOTE]
Please note that fields are only printed in the report if they have a field value. If fields that you add do not have a field value, they will not be printed in the report. If the field with the field value is not printed, you must maintain the data and enter a field value.
You have included the salesperson's name, e-mail address and telephone number in the report.
For more information on how to change the field caption in a report, for example, see the section Change Field Caption.
Move Field in Report
This section describes how you can change the order of fields in the report.
To change the order of a field in a report and move it up or down in the report, proceed as follows:
- Open the search function from the role center (ALT+Q).
- Search for Report Setups and click on the corresponding search result.
- The Report Setups page is displayed.
- Select the corresponding report in the list and click on the value under the ID column in the report line.
- The report card is displayed.
- Under the Fields tab, select the layout area that contains the field you want to move in the report. In the following image, you can identify the individual areas by number.
- 1: Top Left
- 2: Top Right
- 3: Top
- 4: Top Columns
- 5: Before Lines
- 6: Before Line
- 7: After Line
- 8: After Lines
- 9: Bottom
- Select the field that you want to move in the report.
- Use the Move Up and Move Down buttons to control the order of the field in the report.
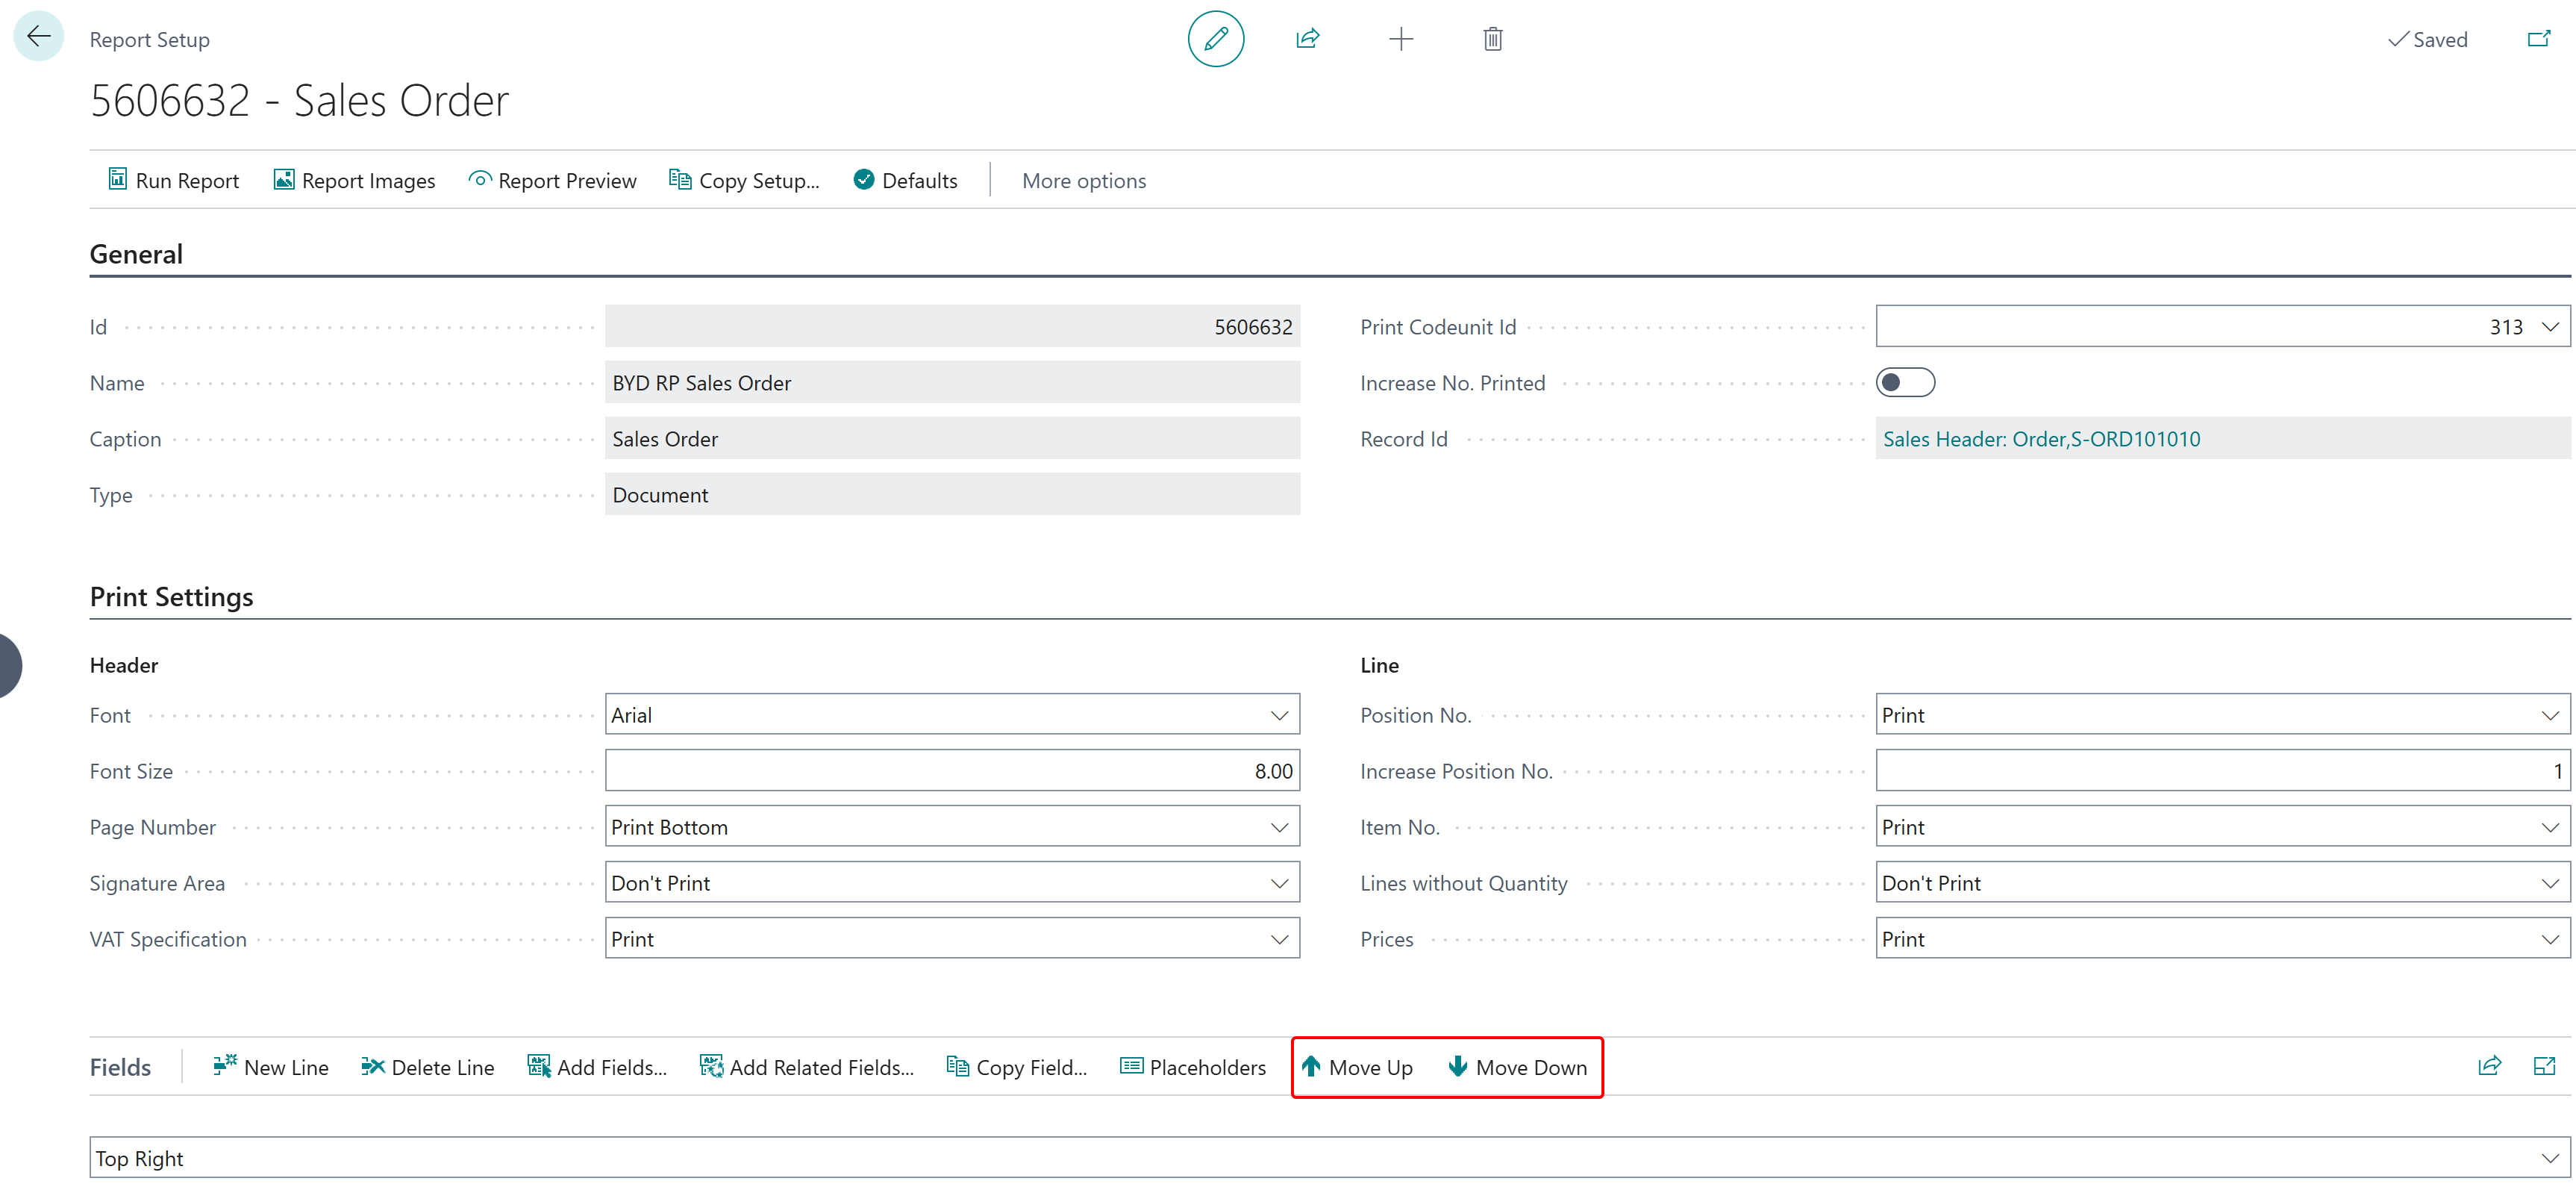
You have edited the order of the fields. You can use the Run Report button in the menu bar on the Report Setup page to check whether the order of the fields meets your requirements.
Edit Field Caption
This section describes how you can change the field caption for a field.
To change a caption for a field, proceed as follows:
- Open the search function from the role center (ALT+Q).
- Search for Report Setups and click on the corresponding search result.
- The Report Setups page is displayed.
- Select the corresponding report in the list and click on the value under the ID column in the report line.
- The report card is displayed.
- Under the Fields tab, select the layout area in which the field for which you want to change a caption is located. In this example, the caption for a field is changed. This field is printed in the Top Right (2) layout area.
- On the Report Detup page under the Fields tab, click in the Caption column in the corresponding line for the field whose caption you want to change. In our example, we will change the caption for the field Sell-to Customer No..

- Change the value in the Caption field to the field label you require (e.g. Customer No.).
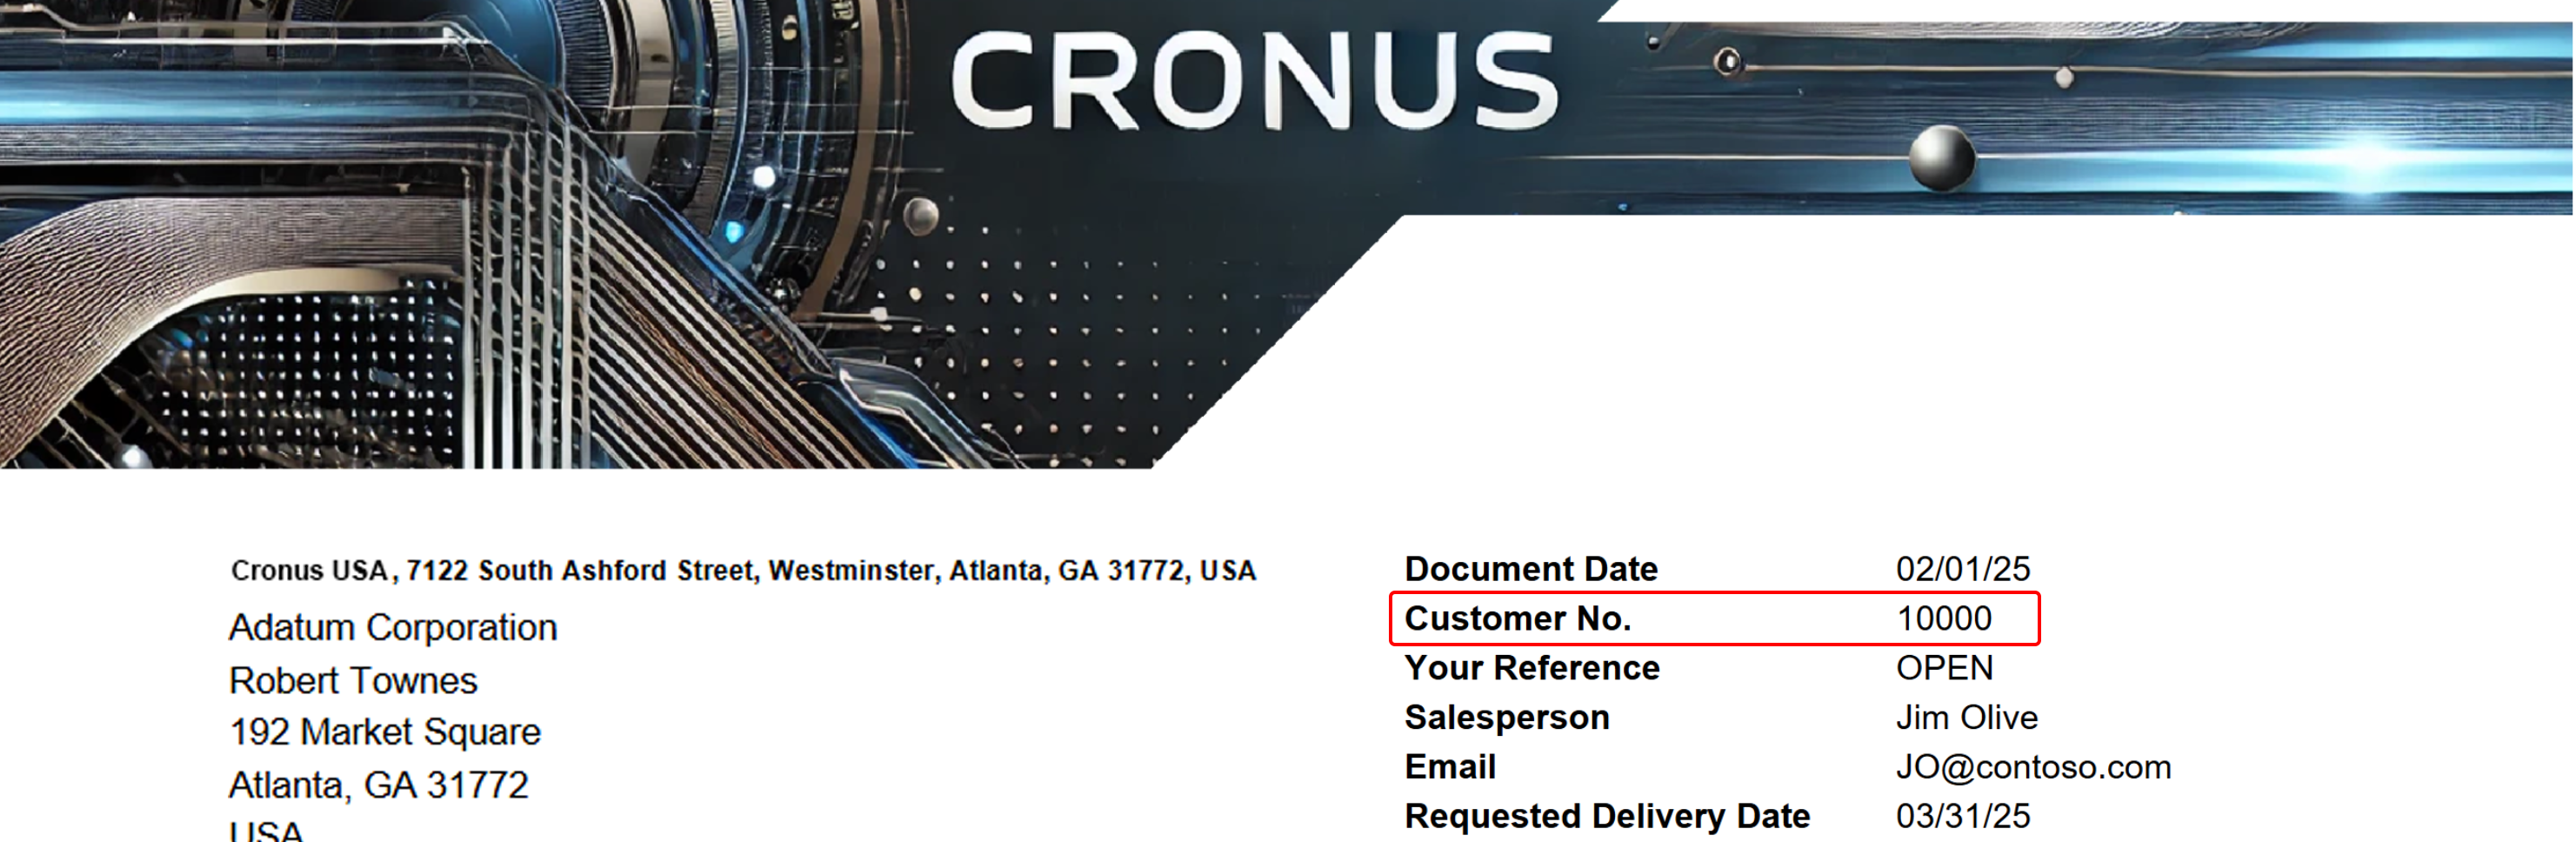
You have changed the caption of the field. You can also use this description to change the caption of the report (here: Sales Order - 101002). The corresponding layout area for this is Top (3).
In addition to changing the field caption, you can also define that field captions are not displayed/printed, but only the field values. For more information on how to hide the field caption, see the section Hide Field Caption.
Please note that the field caption may also need to be adapted for other languages. Further information on this can be found in the section Add Translation for Field Caption.
Add Translation for Field Caption
This section describes how you can add a translation for a field label.
To add a translation for a field label to the report, proceed as follows:
- Open the search function from the role center (ALT+Q).
- Search for Report Setups and click on the corresponding search result.
- The Report Setups page is displayed.
- Select the corresponding report in the list and click on the value under the ID column in the report line.
- The report card is displayed.
- Under the Fields tab, select the layout area in which the field is located for which you want to add a translation for a field caption. In this example, a translation is added for a field caption that has been renamed in the Change Field Caption section from Sell-To Customer No. to Customer No.. This field is printed in the Top Right (2) layout area.
- On the Report Setup page under the Fields tab, click in the No. of Translations column in the appropriate line for the field whose caption you want to add a translation for. In our example, we will change the caption for the Customer Number field.
- The Report Translations window is displayed.
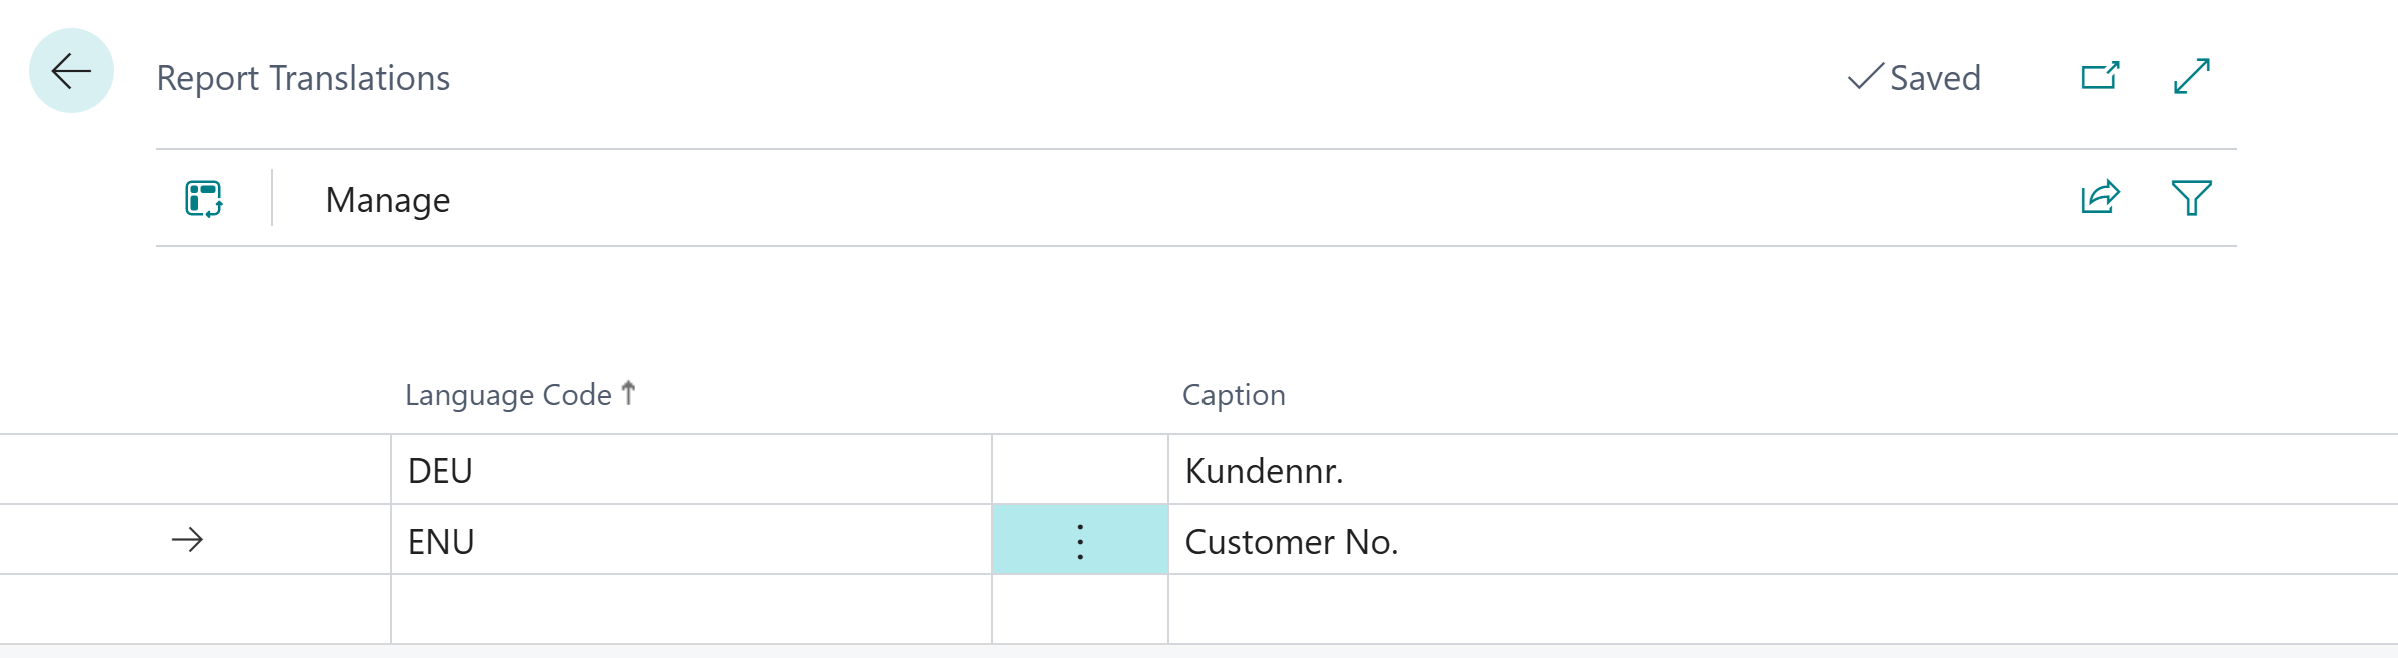
- Under the Language Code column, enter the language in which you would like to store a translation for the field caption.
- Enter the translation in the selected language in the Caption column.
You have stored a translation for a field caption.
Hide Field Caption
This section describes how to hide a field caption so that this caption is not printed in the report. Please note that the field value is printed accordingly.
To hide a field caption in the report, proceed as follows:
- Open the search function from the role center (ALT+Q).
- Search for Report Setups and click on the corresponding search result.
- The Report Setups page is displayed.
- Select the corresponding report in the list and click on the value under the ID column in the report line.
- The report card is displayed.
- Scroll down to the Fields tab.
- In the dropdown list for the layout area, select the area in which the field caption that you want to hide is located. In this example, we are hiding the field caption for the document date. The corresponding field is located in the layout area Top Right (2).
- On the Report Setup page under the Fields tab, deactivate the Print Caption checkbox for the Document Date line.
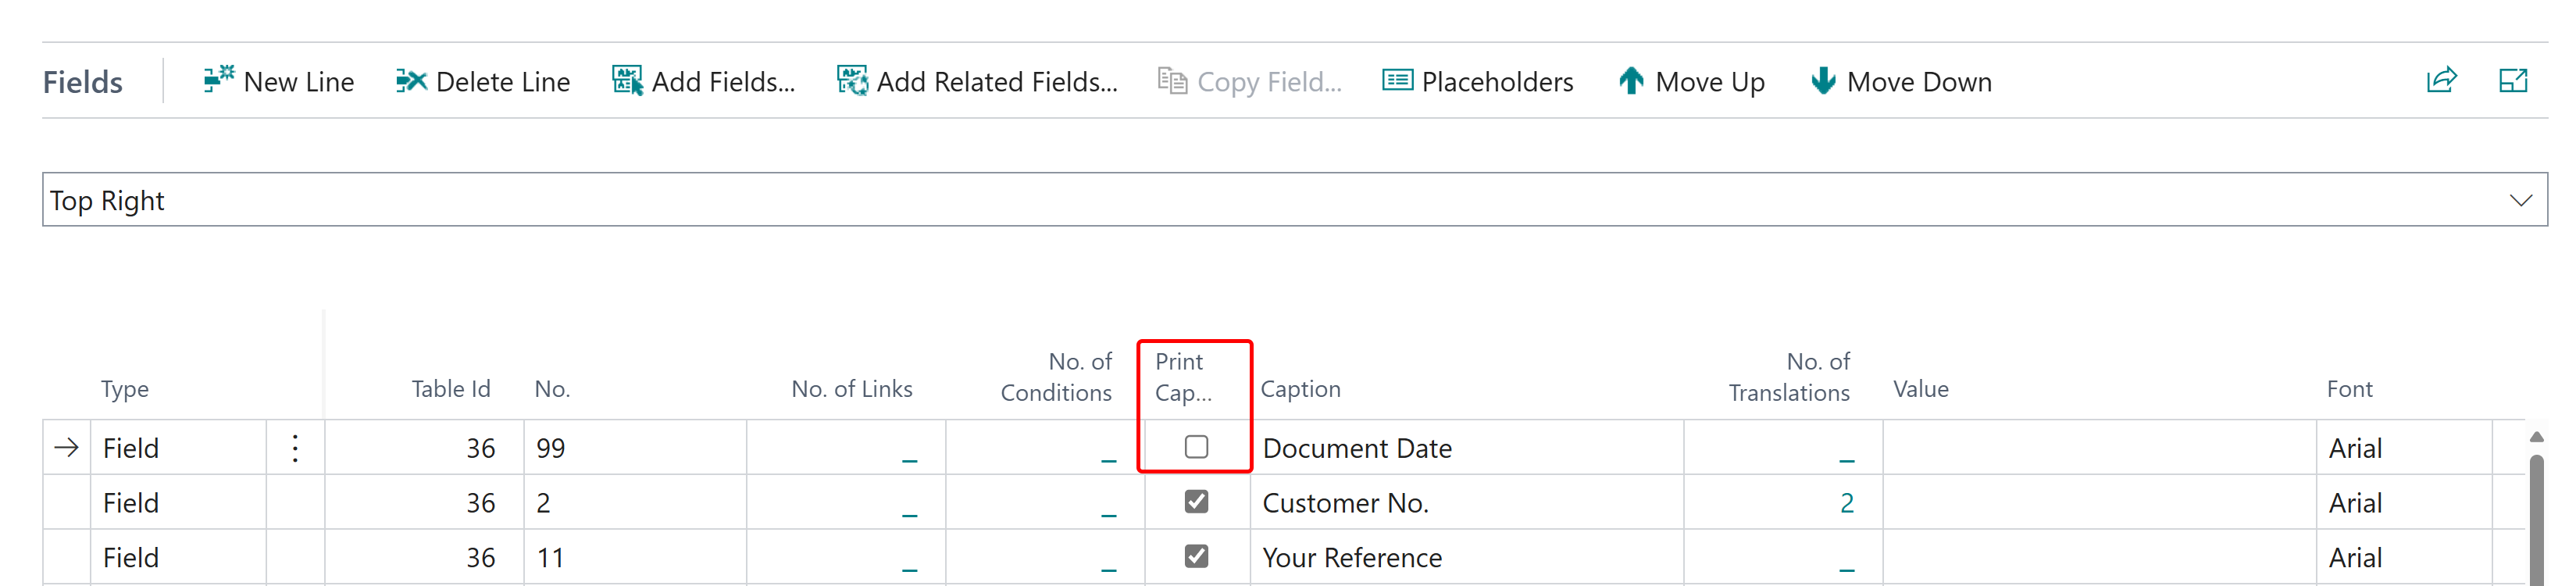
The field label is no longer displayed or printed in the report. For more information on how to display or print the field and the field caption only under certain conditions, see the section Define Condition for Field.
Define Condition for Field
This section describes how you can define conditions that control whether fields with information are displayed in the report. The following description provides an example of how to define a condition that displays additional information in the report when a sales order report is created for a specific customer (here the customer Adatum Corporation).
Beyond ReportsV2 allows you a variety of possible condition configurations, we are happy to help you with the setup. You can find our contact details in the chapter About Beyond ReportsV2.
To define one or more conditions, proceed as follows:
- Open the search function from the role center (ALT+Q).
- Search for Report Setups and click on the corresponding search result.
- The Report Setups page is displayed.
- Select the corresponding report in the list and click on the value under the ID column in the report line.
- The report card is displayed.
- Scroll down to the Fields tab.
- In the drop-down list for the layout area, select the area in which the field for which you want to define a condition is located. In this example, we define a condition that only prints sales information for a specific customer in the report, i.e. the information is not printed on all other sales orders.
- Under the Fields section, click in the corresponding line with the information about the salesperson (see section Add Related Field to Report) in the No. of Conditions column.
- The Report Field Conditions window is displayed.
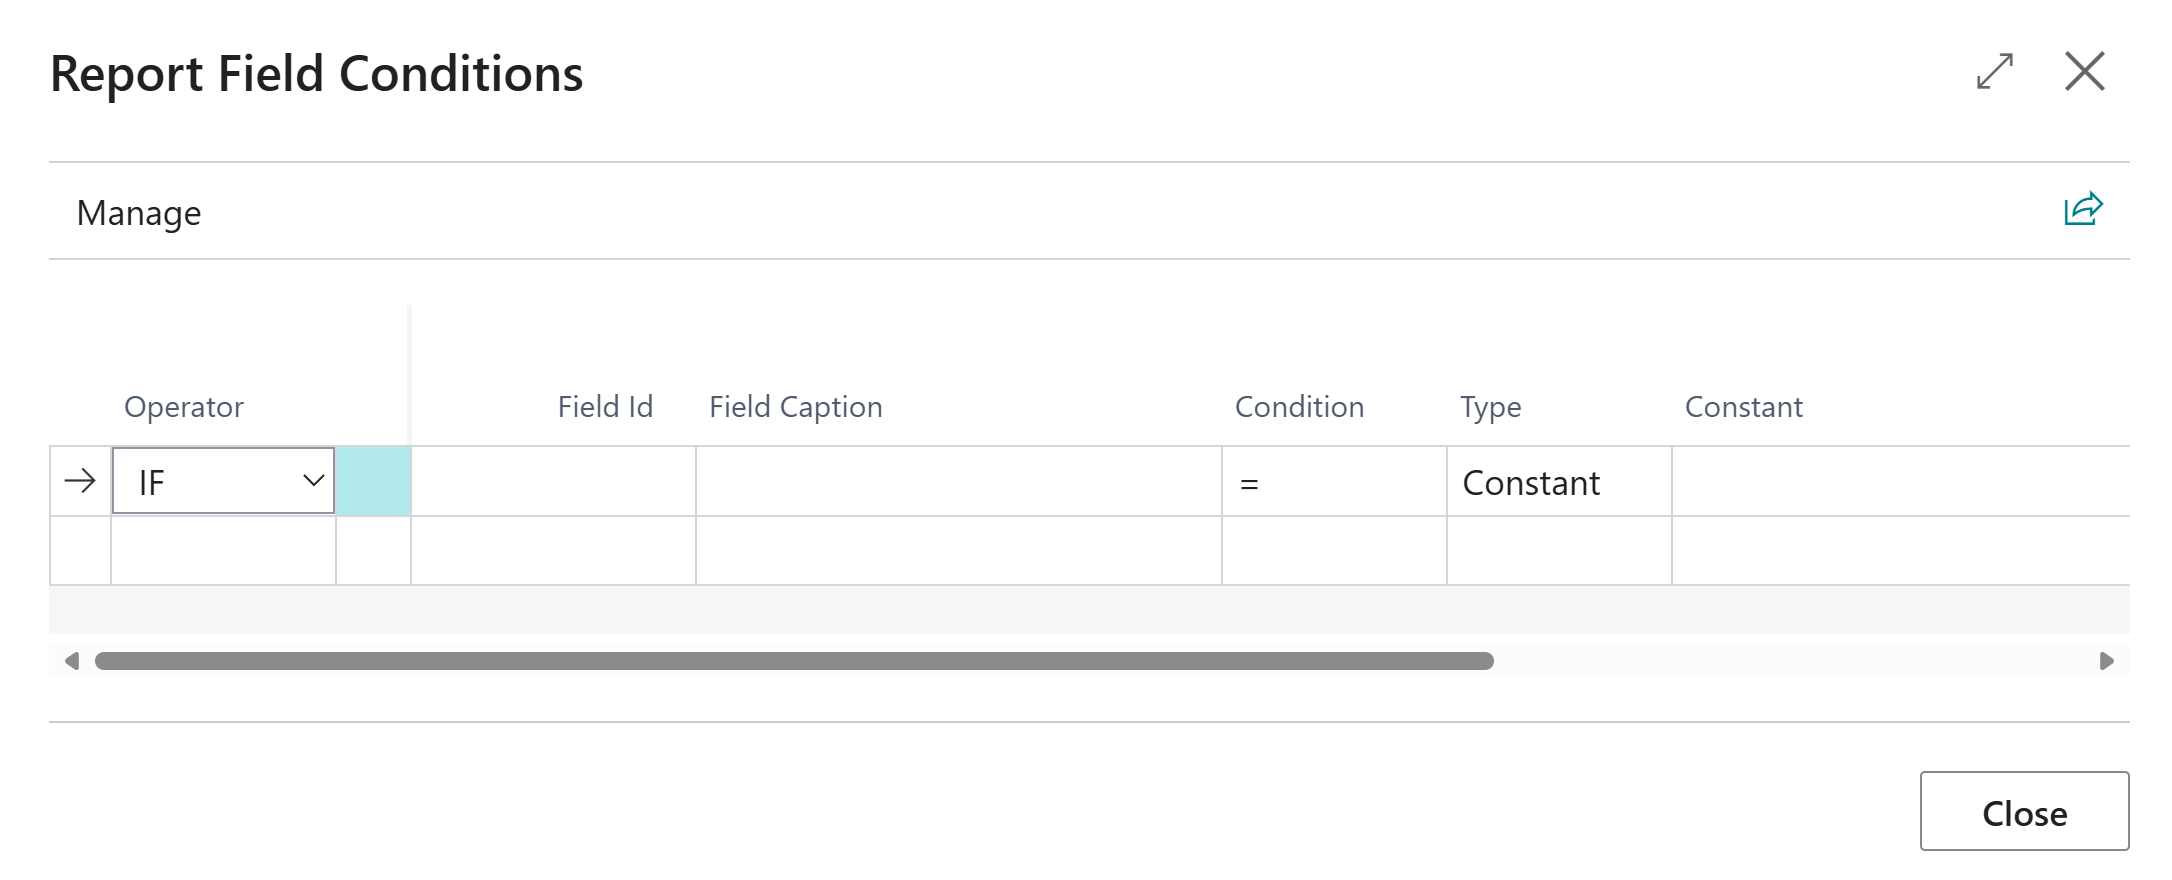
- Select under the Operator column. You can use the following values to configure the condition:
- IF: Select this value if you want to create a condition with an IF clause.
- AND: Select this value to link two conditions with an AND conjunction.
- OR: Select this value to separate two conditions with an OR disjunction.
- In this example, certain information will only be printed in the report if the customer is Adatum Corporation (customer number: 10000), so select the value If under the Operator column.
- Click in the input field under the Field ID column and open the drilldown using the ellipsis button (…).

- The Fields Lookup window is displayed.
- From the Fields Lookup window, select the value that defines the condition. In this example, this would be Sell-To Customer No. (ID: 2).
- To confirm the selection, click on the OK button.
- The view in the Report Field Conditions window is updated.
- Define the condition in more detail. Under the Condition column, you can choose between the following values:
- = Equal to a field value or constant
- <> Not equal to a field value or constant
- > Greater than a field value or constant
- < Smaller than a field value or constant
- For the example, the value = is selected under the Condition column.
- Select between the following values under the Type column:
- Constant: The field value under Field ID corresponds to a static value.
- Field: The field value under Field ID corresponds to another field value.
In the example, the value Constant is selected under the Type column and the value 10000 (the corresponding customer number) is entered under the Constant column.

You have used the condition to define that certain sales order information is only displayed if the sales order is created for customer 10000 (Adatum Corporation).
In the following screenshot, you can see the difference in printing between sales order 101004 for customer 40000 (left) and sales order 101002 for customer 10000 (right).

Add Text Line to Report
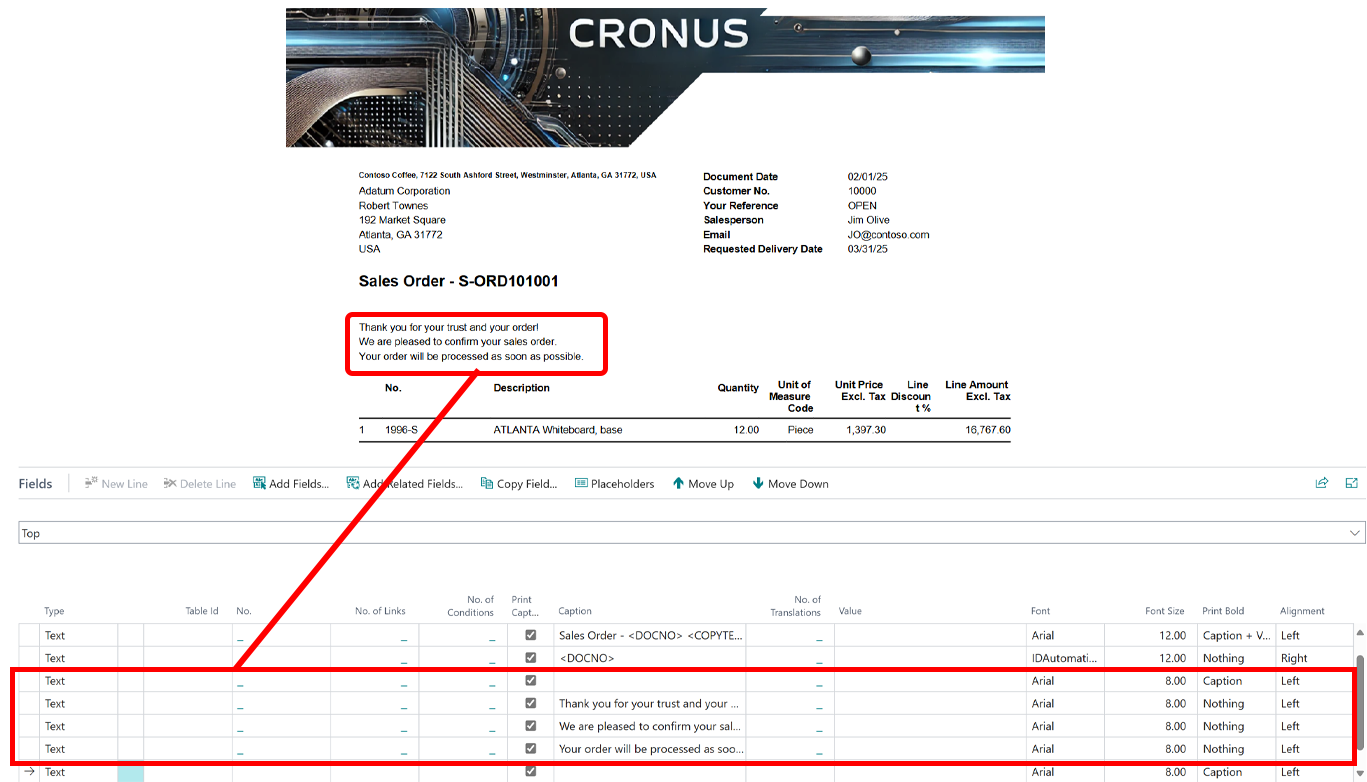
This section describes how to add a line of text to the report. In this example, these general text lines are added to a report:
Thank you for your trust and your order!
We are pleased to confirm your sales order.
Your order will be processed as soon as possible.
Note
Note that this way of adding text to the report does not support more than 80 characters per line. If you want to use a text that contains more than 80 characters, you must therefore either divide the text into correspondingly short sections per line or add the text to the report using rich text. For more information on rich texts and their extended functions, see the section Add Rich Text to Report.
[!INOTE]
When using text lines, you have additional options in addition to the pure text form, such as the use of placeholders, which are automatically replaced in the continuous text with field values from the report. Further information on placeholders and their use can be found in the section Add Placeholder to Text Line.
[!INOTE]
You can store translations for standard texts and field captions in the system. When selecting the report recipient, the corresponding language version of the text/field label is automatically inserted into the report. For more information on translations, see the section Add Translation for Text Line or Add Translation for Field Caption.
To add a line of text to the report, proceed as follows:
- Open the search function from the role center (ALT+Q).
- Search for Report Setups and click on the corresponding search result.
- The Report Setups page is displayed.
- Select the corresponding report in the list and click on the value under the ID column in the report line.
- The report card is displayed.
- Under the Fields tab, select the layout area in which you would like to add a line of text. In the following figure, you can identify the individual areas by number. In this example, text lines are added between the report name (here sales order) and the report lines in the Top(3) layout area.
- 1: Top Left
- 2: Top Right
- 3: Top
- 4: Top Columns
- 5: Before Lines
- 6: Before Line
- 7: After Line
- 8: After Lines
- 9: Bottom
- Select the Top area.
- Insert a new line with the value Text under the Type column in the Fields area.
- Enter the text for the text line under the Caption column. As already mentioned above, the standard text function only allows 80 characters, so you must split the text into several text lines if necessary.
- Change the value in the Print Bold column from Caption to Nothing.
You have added a line of text to a layout area. You can move the individual text lines by proceeding as described in the section Move Field in Report. Placeholders can be used in these text lines to place report-specific field values in the text lines. Further information on placeholders and their use can be found in the section Add Placeholder to Text Line.
Add Placeholder to Text Line
This section describes how to add a placeholder to a text line. Placeholders can reference any field value from the report, for example the customer reference (field Your Reference, ID: 11) or the delivery date (field Requested Delivery Date, ID: 5790) for the document.
To use a placeholder in a text line in the report, proceed as follows:
- Open the search function from the role center (ALT+Q).
- Search for Report Setups and click on the corresponding search result.
- The Report Setups page is displayed.
- Select the corresponding report in the list and click on the value under the ID column in the report line.
- The report card is displayed.
- Under the Fields tab, select the layout area in which you would like to add a placeholder in a text line. In the following figure, you can identify the individual areas by number. In this example, a placeholder is added in a text line between the report name (here sales order) and the report lines in the Top(3) layout area.
- 1: Top Left
- 2: Top Right
- 3: Top
- 4: Top Columns
- 5: Before Lines
- 6: Before Line
- 7: After Line
- 8: After Lines
- 9: Bottom
- Select the Top area.
- Click on the Placeholder option in the menu bar.
- The Report Placeholders window opens.
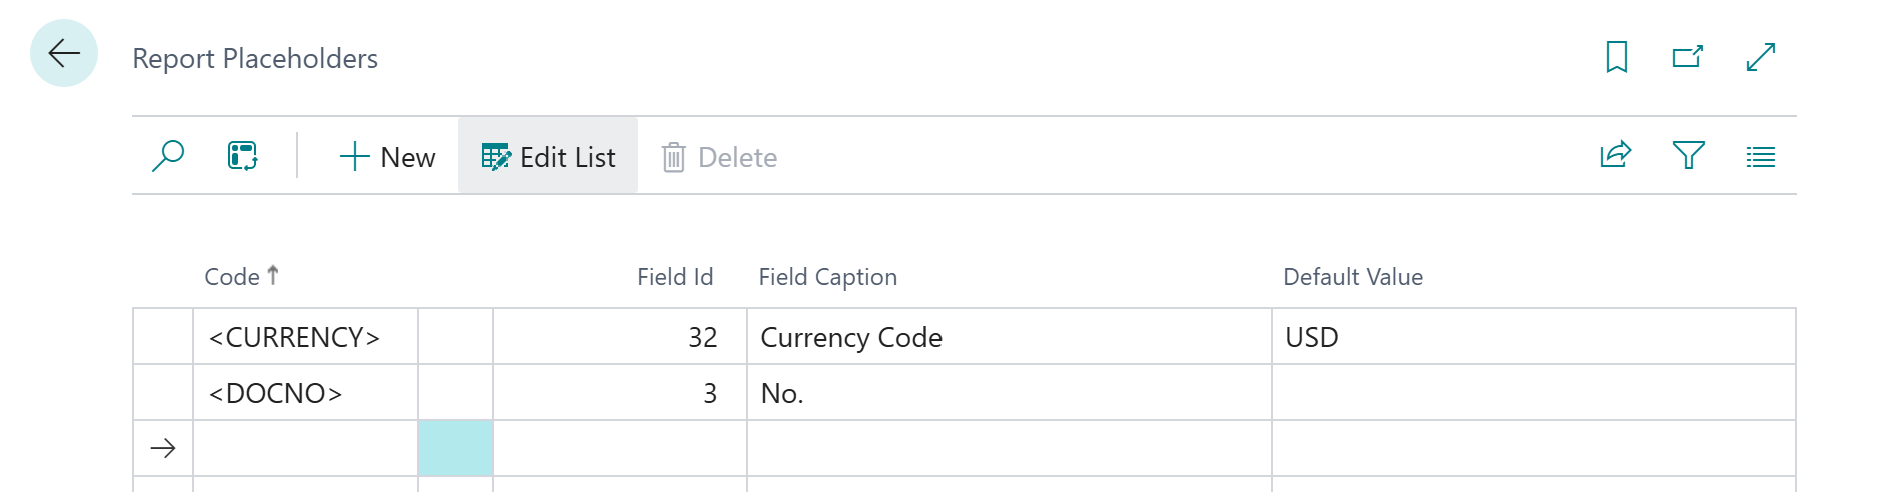
- Click in the Code column and enter the code for the placeholder. We recommend enclosing the code in brackets with a special character (e.g. <REFERENCE>).
- Under the Field ID column, select the field whose field value is to be added to a text line using the placeholder. For example, this can be the customer reference (field Your reference, ID: 11) or the delivery date (field Requested Delivery Date, ID: 5790).
- The value in the Field Caption column is updated by the system.
- You can define a default value for the placeholder under the Default value column.
- To use the placeholder in the text line, enter the placeholder code in the body text.

You have created a placeholder and used it in a line of text. Beyond ReportsV2 automatically replaces the placeholder with the referenced specific field value in the report.
Note
Please note that no formulas can be entered when specifying the default value for a placeholder. Formulas (today + 5 days) cannot be used. You must specify a constant as the default value.
Note
Please note that placeholders can only reference field values and insert them into texts if the referenced field has a field value. If no field value is entered, the text line is still printed. However, you can use a condition to prevent the text line from being printed. To do this, you must define under the text line in the No of Conditions column that the text line is only printed if the field contains a value. The condition must be defined as follows: Selected field for the placeholder Equal to Constant Blank.

Add Translation for Text Line
This section describes how to add a translation for a line of text. Please note that you must maintain a translation for each line of text that you have added in accordance with these instructions. We recommend using rich texts for longer texts. For more information on this text type, see the section Add Rich Text to Report.
To add a translation for a line of text, proceed as follows:
- Open the search function from the role center (ALT+Q).
- Search for Report Setups and click on the corresponding search result.
- The Report Setups page is displayed.
- Select the corresponding report in the list and click on the value under the ID column in the report line.
- The report card is displayed.
- Under the Fields tab, select the layout area in which you would like to add a translation for a line of text. In the following figure, you can identify the individual areas by number. In this example, a translation is added for a text line in the Top(3) layout area.
- 1: Top Left
- 2: Top Right
- 3: Top
- 4: Top Columns
- 5: Before Lines
- 6: Before Line
- 7: After Line
- 8: After Lines
- 9: Bottom
- Select the Top area.
- Click in the line for the corresponding text line in the No. of Translations column.
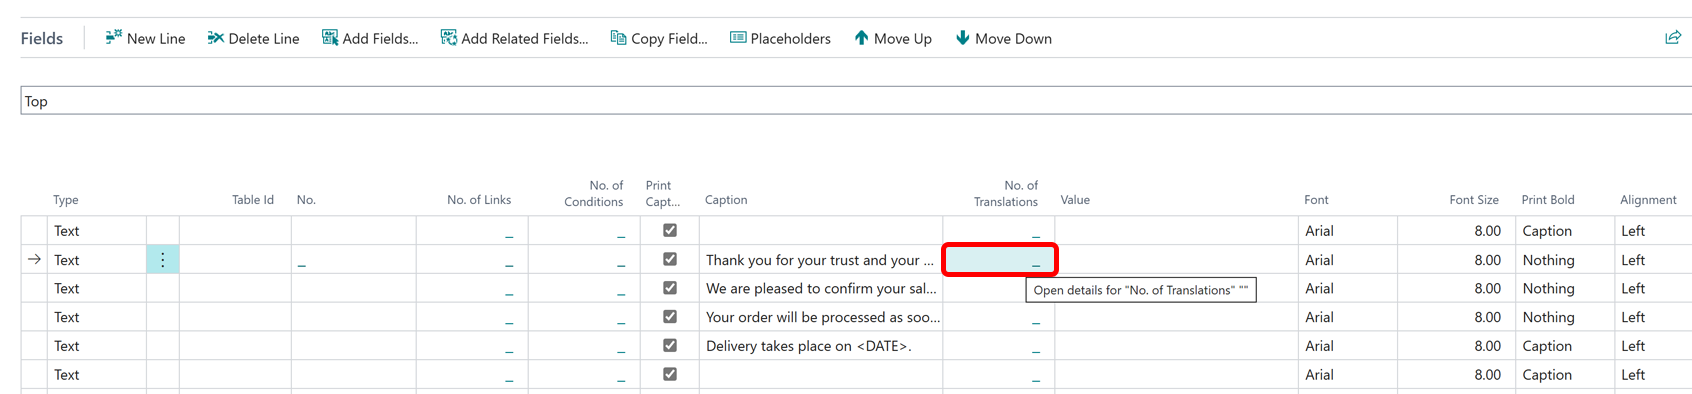
- The Report Translations window is displayed.
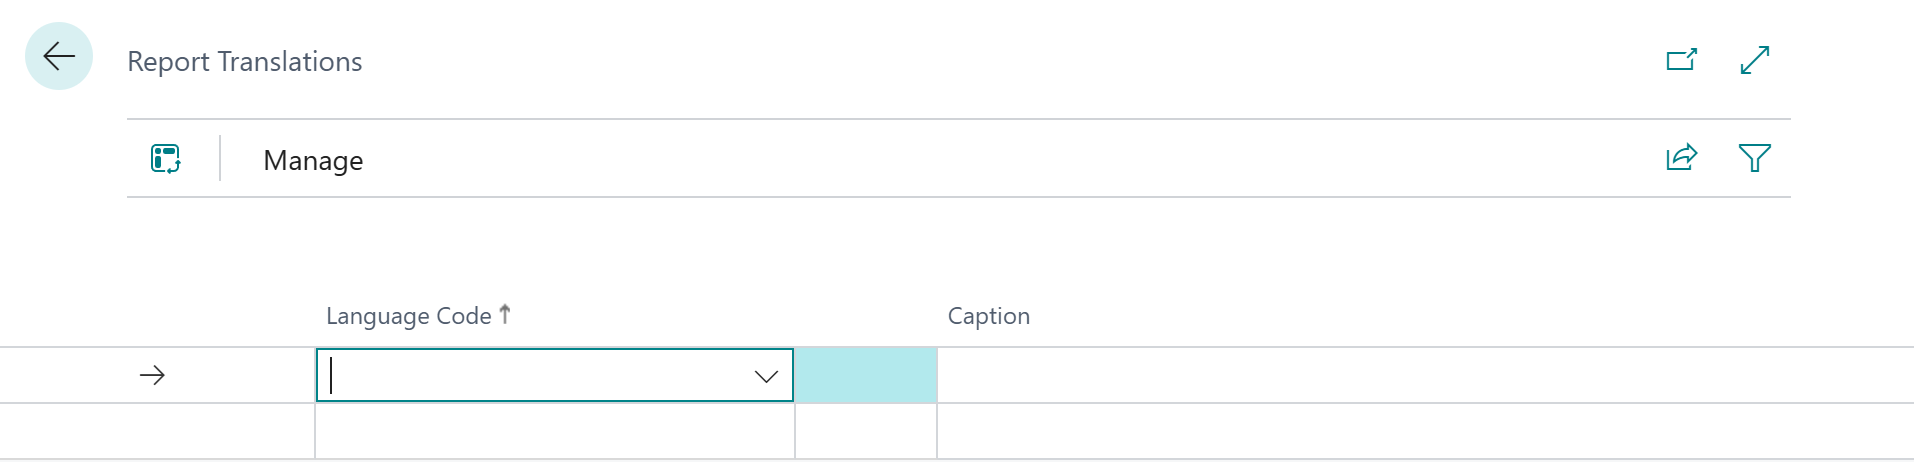
- Under the Language Code column, enter the language in which you want to store the translation for the text line.
- Enter the translation of the text line under the Caption column.
You have added a translation for a line of text.
Add Seasonal Text to Report
This section describes how to add a seasonal text to a report. Seasonal texts are used in Beyond ReportsV2 to display a text only within a specific time period.
To create a seasonal text and add it to a report, proceed as follows:
- Open the search function from the role center (ALT+Q).
- Search for Report Setups and click on the corresponding search result.
- The Report Setups page is displayed.
- Select the corresponding report in the list and click on the value under the ID column in the report line.
- The report card is displayed.
- Under the Fields tab, select the layout area in which you would like to add a seasonal text. In the following figure, you can identify the individual areas by number. In this example, a seasonal text for the end of the year is added in the Bottom (9) layout area.
- 1: Top Left
- 2: Top Right
- 3: Top
- 4: Top Columns
- 5: Before Lines
- 6: Before Line
- 7: After Line
- 8: After Lines
- 9: Bottom
- Click in the Fields area in a new line and select the Seasonal Text value under the Type column.
- In the No. column, click in the input field and select the New option.
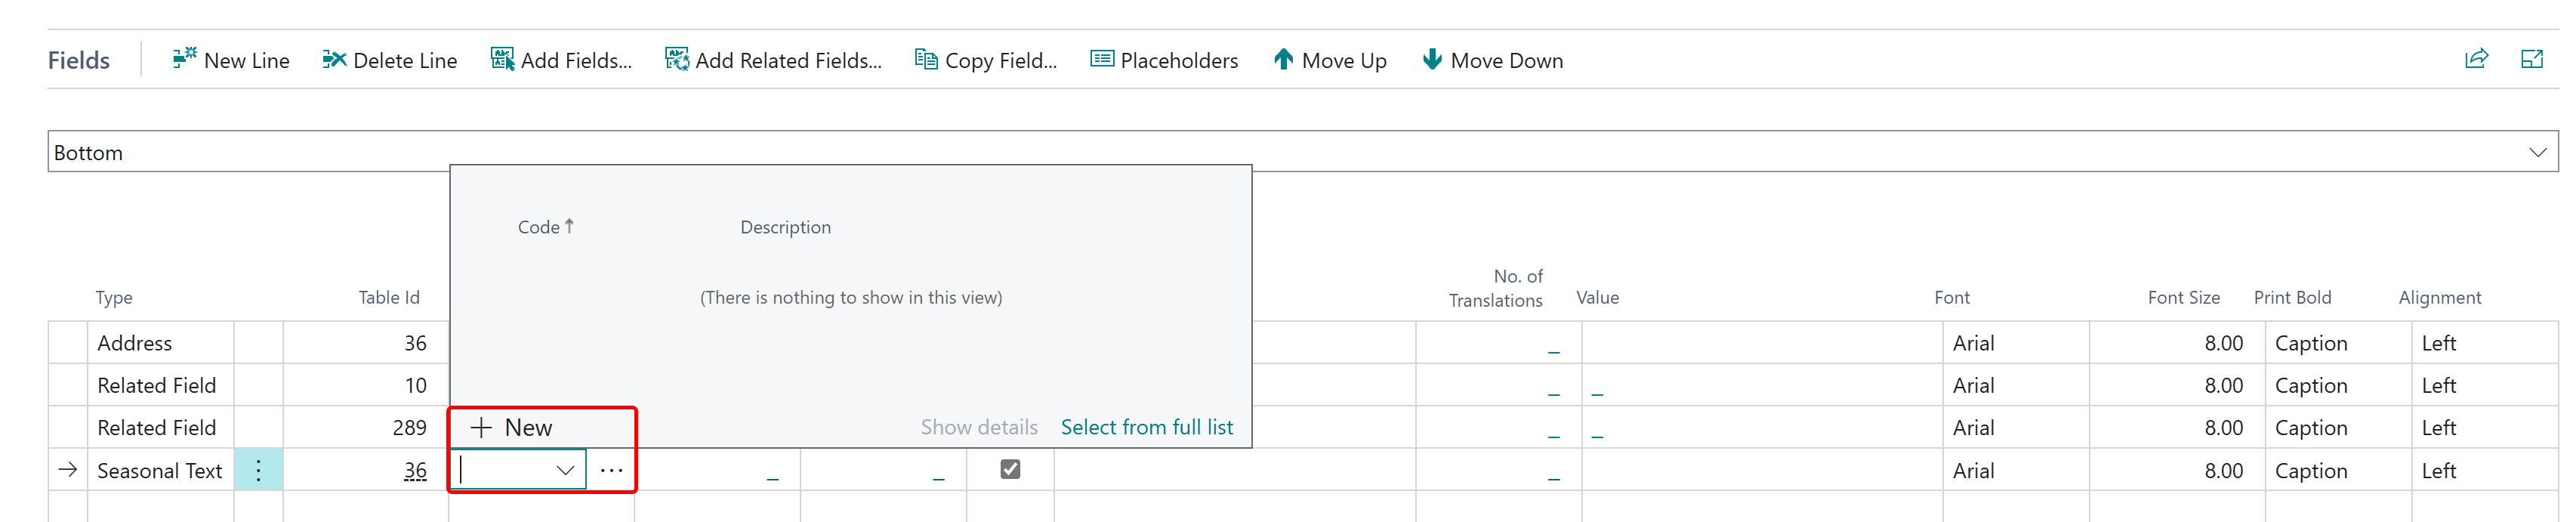
- The Select - Seasonal texts window is displayed.
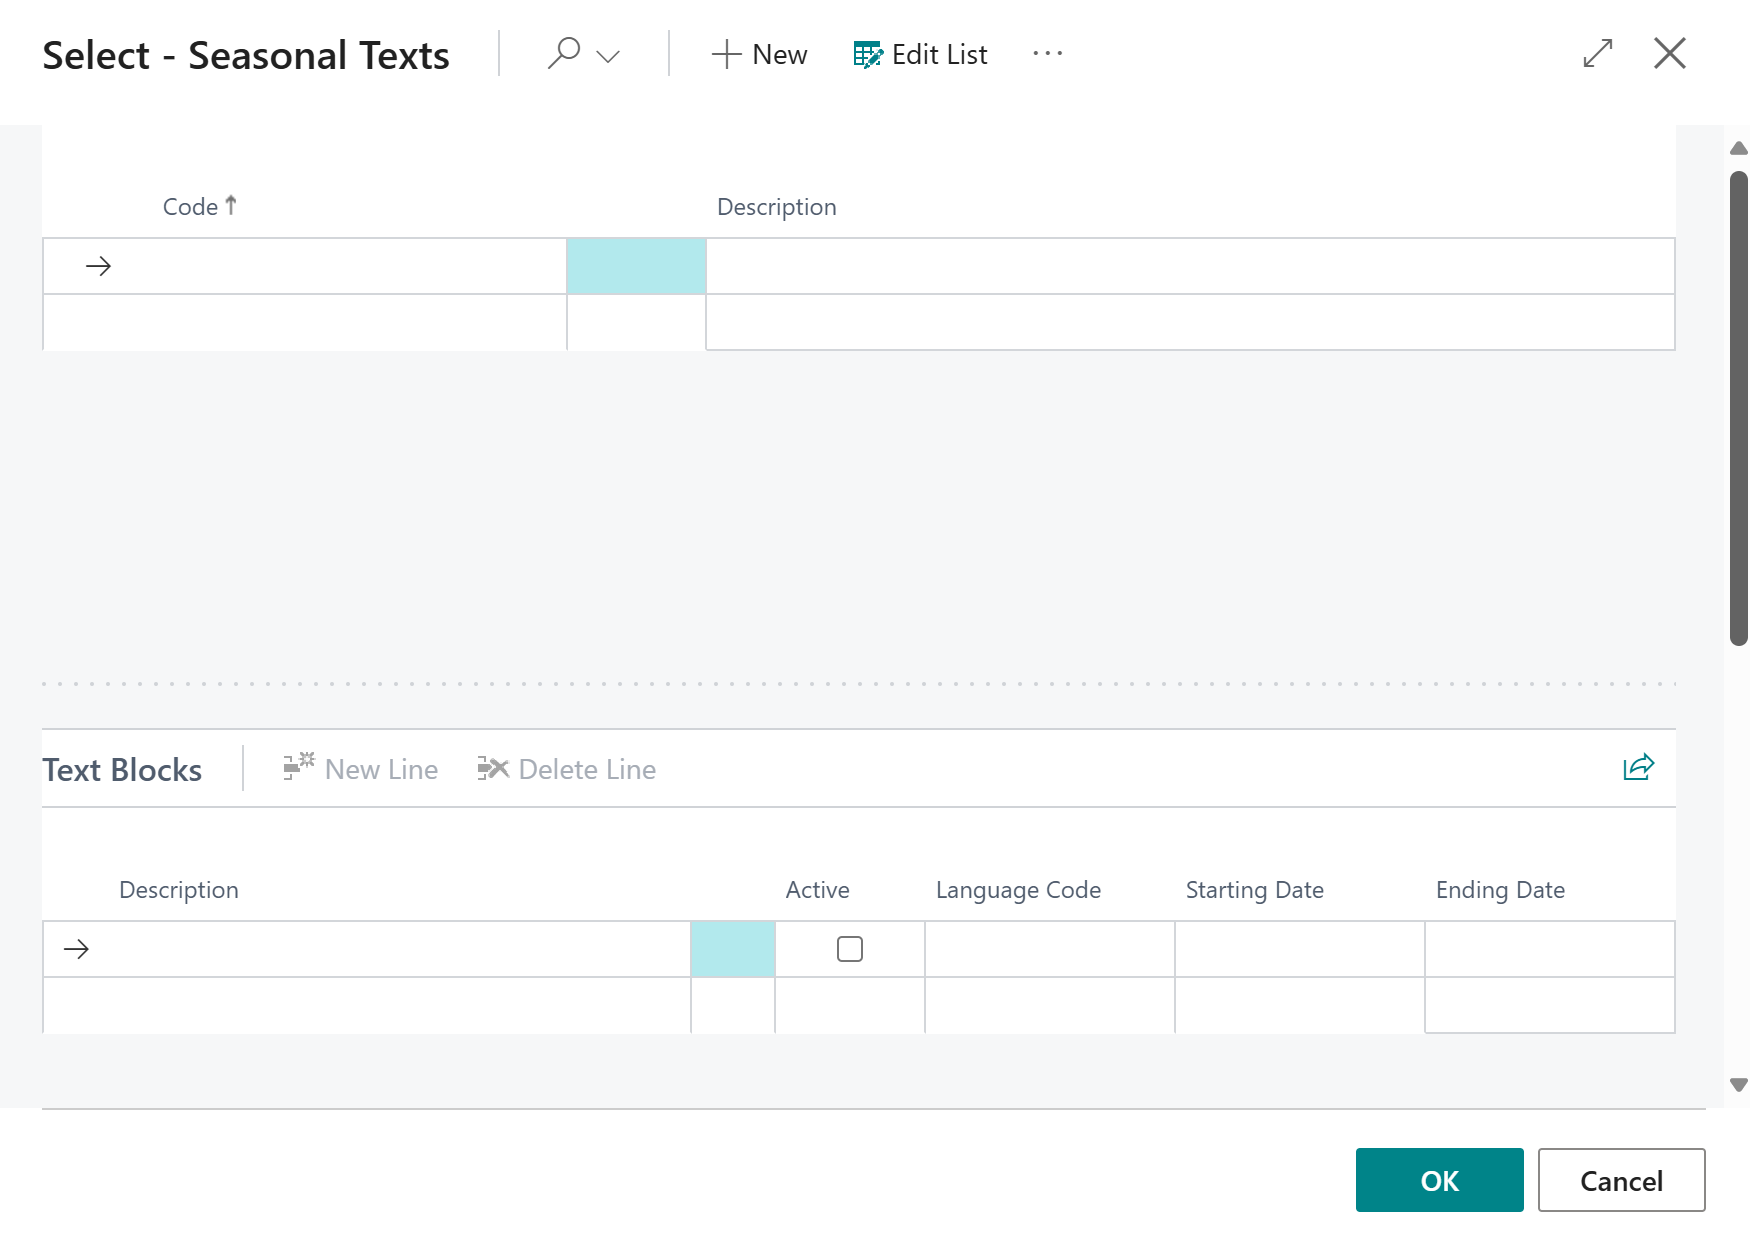
- Enter a code for the seasonal text in the Code column.
- Enter a description for the seasonal text under the Description column.
- Activate the checkbox under the Active column.
- Enter the appropriate language code for the text under the Language Code column.
- Under the Starting Date column, define the date from which the seasonal text is to be printed in the reports.
- Under the Ending Date column, define the date from which the seasonal text should no longer be printed in the reports.
- Scroll down and click in the text input field.
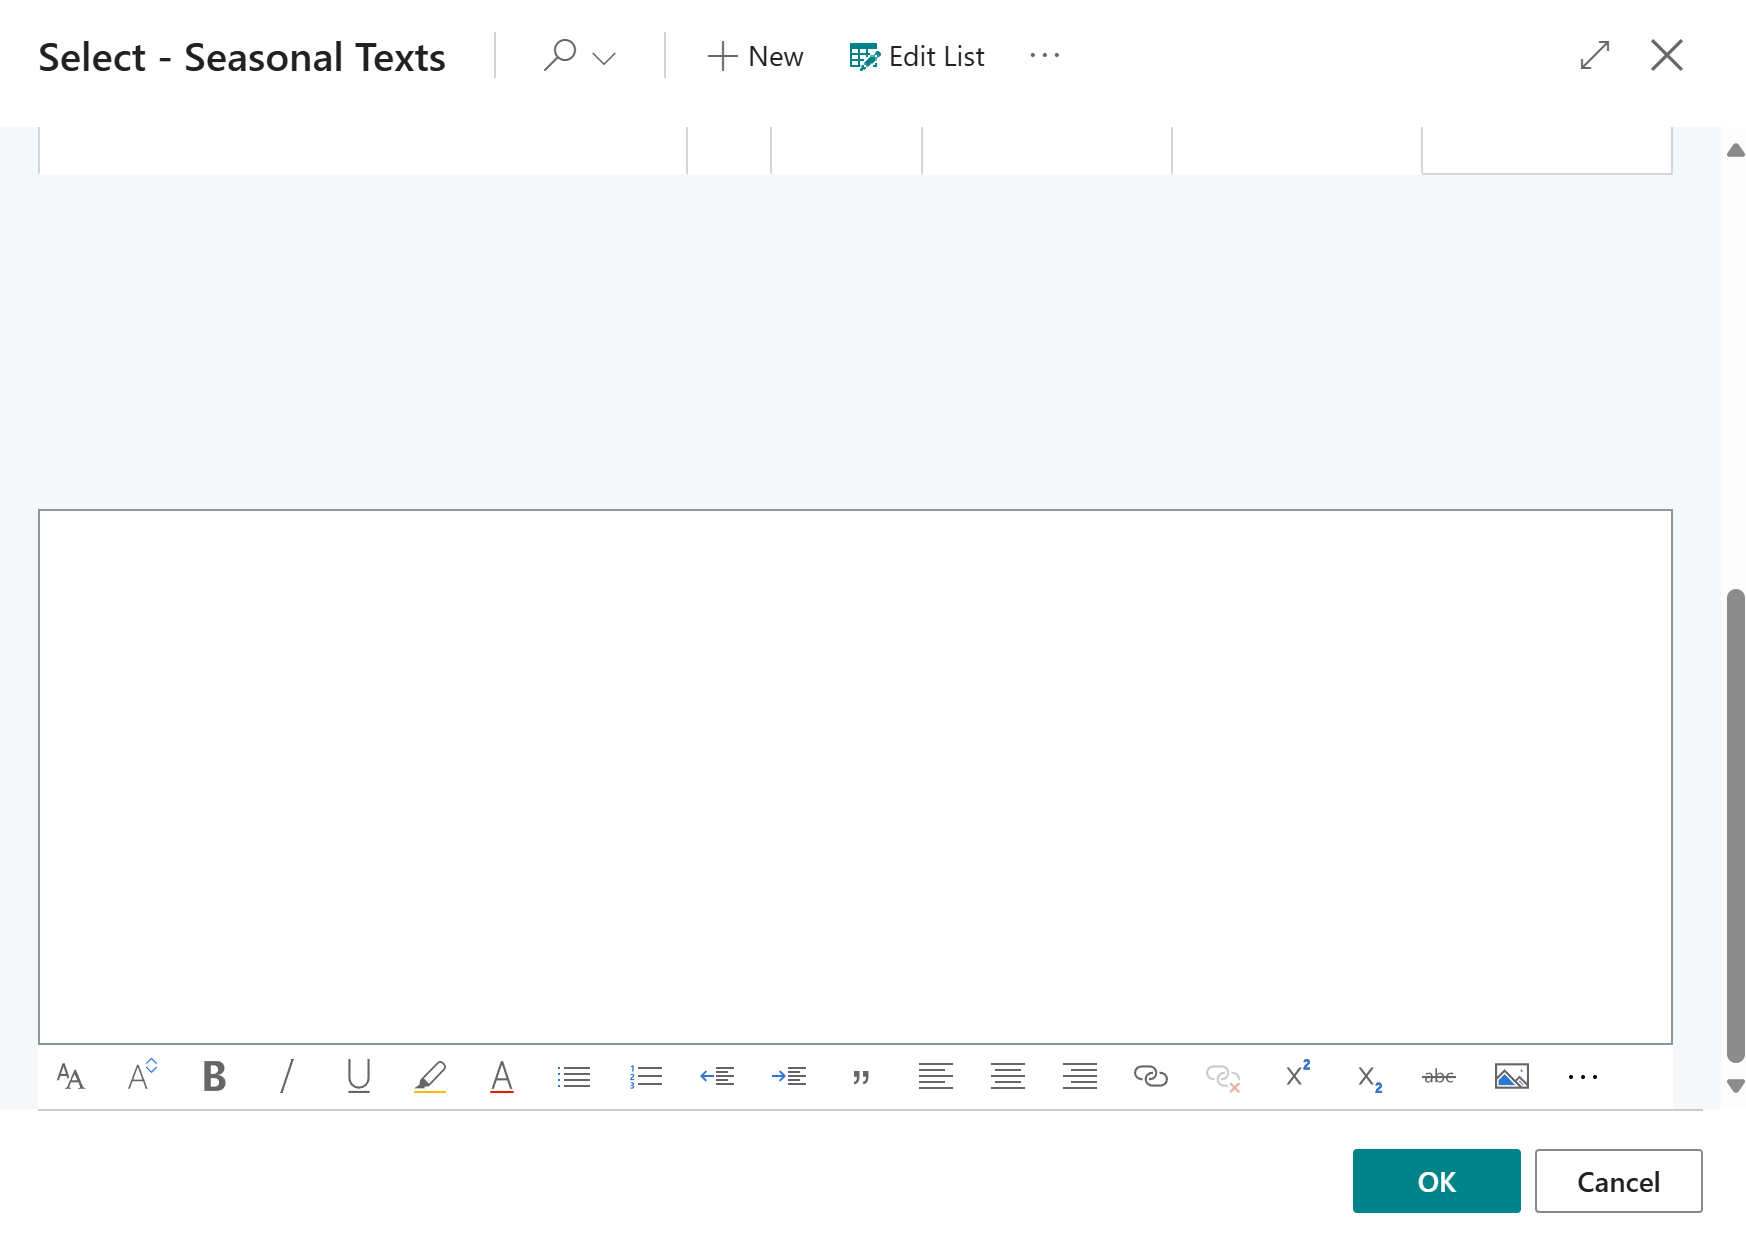
- Enter the continuous text for the seasonal text and click OK. The following options are available for the design:
| Icon | Description |
|---|---|
 |
Font: Click on this icon to change the font of the text. |
 |
Font Size: Click on this icon to change the size of the font. |
 |
Font Style Bold: Click on this icon to change the font style between bold or normal. |
 |
Font Style Italic: Click on this icon to change the font style between italic or normal. |
 |
Font Style Underlined: Click on this icon to change the font style between underlined or normal font style. |
 |
Background Color: Click on this icon to define the color behind the font. |
 |
Font Color: Click on this icon to define the color of the font. |
 |
Bulleted List: Click on this icon to format the selected text as a bulleted list. |
 |
Ordered List: Click on this icon to add a number to the selected text. |
 |
Reduce indentation: Click on this icon to reduce the indentation of the text. |
 |
Increase indentation: Click on this icon to increase the indentation of the text. |
 |
Quote: Click on this icon to mark the text as a quote. |
 |
Align Left: Click on this icon to align the text to the left. |
 |
Align Center: Click on this icon to align the text to the center. |
 |
Align Right: Click on this icon to align the text to the right. |
 |
Add Link: Click on this icon to insert a link into the text. |
 |
Delete Link: Click on this icon to remove the selected link in the text. |
 |
Superscript: Click on this icon to format the selected text as superscript. |
 |
Subscript: Click on this icon to format the selected text as subscript. |
 |
Strikethrough: Click on this icon to format the selected text with a strikethrough. |
 |
Add Image: Click on this icon to add an image. |
 |
Add Alternative Text: Select an image in the text and click on this icon to add an alternative text (image caption). |
 |
Text Direction From Left To Right: Click on this icon to format the selected text from left to right. |
 |
Text Direction From Right To Left: Click on this icon to format the selected text from right to left. |
 |
Revert Changes: Click on this icon to undo your changes to the text. |
 |
Repeat: Click on this icon to repeat your changes to the text after you have reverted them. |
 |
Delete Formatting: Click on this icon to remove the formatting from the selected text. |
 |
Insert Table: Click on this icon to insert a table into the text. |
You have created a seasonal text and added it to the report.
Add Rich Text to Report
This section describes how to add a rich text to the report. Please note that rich texts can only be used if you have installed and licensed the Beyond RichText app.
For the following description, we assume that the Beyond RichText app is installed and licensed, and that rich text types and rich text templates have already been created. For more information on how to create rich text types and templates, please refer to the corresponding documentation for Beyond RichText.
To use a rich text in a report, proceed as follows:
- Open the search function from the role center (ALT+Q).
- Search for Report Setups and click on the corresponding search result.
- The Report Setups page is displayed.
- Select the corresponding report in the list and click on the value under the ID column in the report line.
- The report card is displayed.
- Under the Fields tab, select the layout area to which you want to add the rich text. In the following figure, you can identify the individual areas by number.
- 1: Top Left: This layout area is located at the top left of the report and is primarily used as the address area. For more information on setting the address, please refer to the section Edit Report Address Format.
- 2: Top Right: *This layout area is located at the top right of the report and is primarily used to display additional information relevant to the report.
- 3: Top: *This layout area is located in the report below the address area and the report information.
- 4: Top Columns: **This layout area is located in the report above the column headers for the report lines.
- 5: Before Lines: *This layout area is located before all report lines.
- 6: Before Line: This layout area is located before each report line. Please note that this layout area is repeated per line.
- 7: After Line: This layout area is located after each report line. Please note that this layout area is repeated per line.
- 8: After Lines: This layout area is located after all report lines.
- 9: Bottom: This layout area is located at the bottom of the report.
Other selectable areas such as Line, Totals and VAT Specification are reserved by the system and cannot be edited. If you want to hide the VAT Specification report area, you will find the corresponding setting in the Define Print Settings section.
- In our example, we select the layout area Top (3).
- Click in a new row under the Fields area and select the value Related field under the Type column.
- Click in the Table ID column and enter the value 5606705 (BYD RT Rich Text Data).
- Click in the No. column and enter the value 10 (Rich text data).
- Click in the No. of Links column.
- The Report Field Links window is displayed.
- Define the following lines in the Report Field Links window:
- Field ID: 1, Field Caption: Source Record ID, Link Type: Record ID
- Field ID: 2, Field Caption: Type Code, Link Type: Filter, Filter Value: Code of the rich text template that you want to include

- Close the Report Field Links window.
- Deactivate the checkbox for the rich text line under the Print Caption column.
You have added a rich text to a report.