Create Collective Shipment
This section describes how to create a collective shipment.
To create a collective shipment, sales shipments or service shipments must already be booked in your system.
Proceed as follows to create a collective shipment:
- Open the search function from the role center (ALT+Q).
- Search for Collective Shipments and click on the corresponding search result.
- The Collective Shipments page is displayed.

- To create a collective shipment, click on New in the menu bar.
- A new collective shipment card is displayed.
- Click in the Customer No. field and select the customer for whom you want to create a collective shipment from the drop-down list. The No. field is automatically assigned by the system based on the number series set up. Further information on setting up Beyond CollectiveShipments can be found in the chapter Setup Beyond CollectiveShipments.
- Under the Shipping Agent tab in the Shipping Agent Code field, select a shipping agent who will transport the collective shipment to the customer. If the relevant shipping agent is not included in the drop-down list, you must create the carrier. You can find further information on this in the chapter Create delivery agent.
- Your company data is entered under the Transport tab in the Ship-from tab. You can adjust or complete these if necessary.
- Click in the Ship-To Code field and select the location of the customer from the dropdown list. Other fields in this area are automatically filled in by the system. If necessary, you can adjust or complete them.
- Under the Shipment Details tab, enter the collection date of the deliveries in the Collection at Date field.
- Enter the earliest possible time for the collection day in the Collection from Time field.
- Enter the last possible time for the collection day in the Collection to Time field.
- Enter the delivery day in the Delivery at Date field.
- Enter the earliest possible time for the delivery day in the Delivery from Time field.
- Enter the last possible time for the delivery day in the Delivery to Time field.
- In the Goods area, you can enter a text for the collective shipment in the Goods Description field.
- Activate the Dangerous Goods slider if the collective shipment includes dangerous goods.
- To fill the Lines area with shipments, click on the Get Shipments option in the menu bar.
- Select whether you want to include deliveries from sales documents or service documents in the collective shipment.
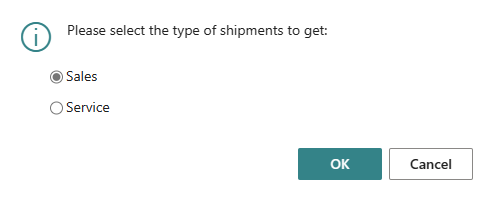
- Click on OK to go to the posted Shipments.

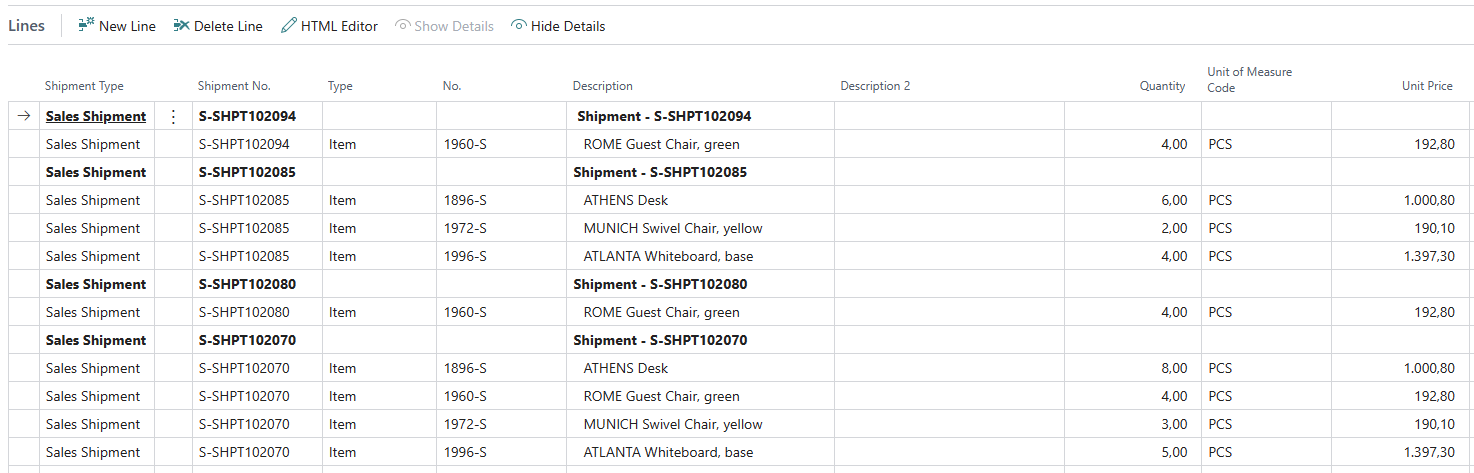
- Select one or more lines from the posted shipments and click on OK.
- The shipments are transferred to the Lines area in the collective shipment card. If you have set up the system so that no details are displayed by default, you can use the Show Details option in the menu bar of the Lines tab to display additional information on the individual shipments in the lines.
- If you want to add a text to the collective shipment, click on the HTML Editor option in the menu bar. You can enter the text in the window that appears. For more information on where the text is displayed and what options you have for formatting and designing the text, please refer to the sections Create Document Pre-Text and Create Document Post-Text.
- After entering the text, you can print the collective shipment using the Print button.
Please note that Beyond CollectiveShipments is based on Beyond Reports, i.e. the corresponding design of the area (i.e. the collective shipment) must be set up in Beyond Reports.