Add Additional Information to Item
This chapter describes how to add additional information to an item.
If there are additional information for an item and the item is used in a sales or purchase document, exclamation marks is displayed in the document lines under the Additional Information column to indicate that there are information for the item.
To add information to an item, proceed as follows:
- Call up the search function from the role center (ALT+Q).
- Search for Items and click on the corresponding search result.
- The Items list is displayed.
- Open the item card for the item for whom you want to store an additional information.

Figure: Additional Information on Item Card - Click on Item > Additional Information in the menu bar.
- The Additional Information page is displayed.
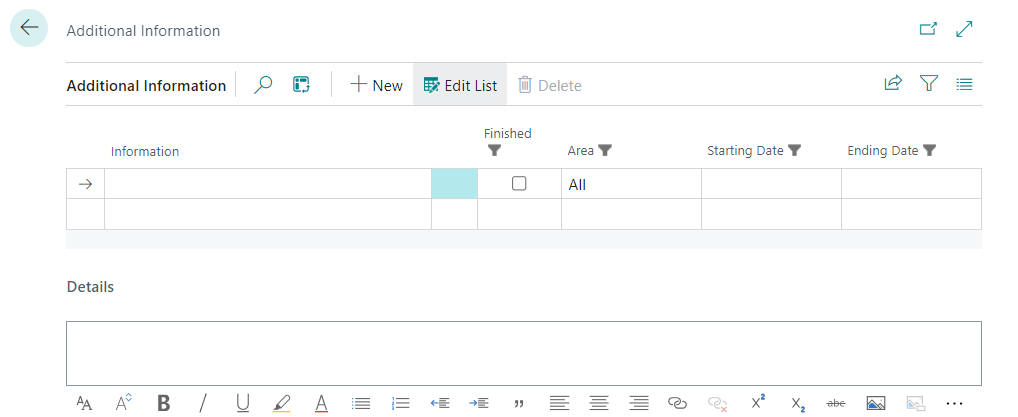
Figure: Additional Information - To create a new additional information, click on the New option in the menu bar.
- Enter a description for the additional information in the Information column.
- The checkbox under the Completed column is used to control whether this additonal information is activated, i.e. whether it is displayed in documents and the corresponding cards.
- Select a value under the Area column to control on which documents the additonal information is to be displayed.
- Enter a start date to define the date from which the additional information is displayed. Leave this field blank if you want the additional information to be displayed immediately.
- Enter an end date to define the date from which the additional information is no longer displayed. Leave this field blank if the additional text is to be displayed without an expiration date.
- After you have defined the general data, you can write out the text in the Details area on the page. The following options are available to you for designing the text:
| Icon | Description |
|---|---|
 |
Font: Click on this icon to change the font of the text. |
 |
Font Size: Click on this icon to change the size of the font. |
 |
Font Style Bold: Click on this icon to change the font style between bold or normal. |
 |
Font Style Italic: Click on this icon to change the font style between italic or normal. |
 |
Font Style Underlined: Click on this icon to change the font style between underlined or normal font style. |
 |
Background Color: Click on this icon to define the color behind the font. |
 |
Font Color: Click on this icon to define the color of the font. |
 |
Bulleted List: Click on this icon to format the selected text as a bulleted list. |
 |
Ordered List: Click on this icon to add a number to the selected text. |
 |
Reduce indentation: Click on this icon to reduce the indentation of the text. |
 |
Increase indentation: Click on this icon to increase the indentation of the text. |
 |
Quote: Click on this icon to mark the text as a quote. |
 |
Align Left: Click on this icon to align the text to the left. |
 |
Align Center: Click on this icon to align the text to the center. |
 |
Align Right: Click on this icon to align the text to the right. |
 |
Add Link: Click on this icon to insert a link into the text. |
 |
Delete Link: Click on this icon to remove the selected link in the text. |
 |
Superscript: Click on this icon to format the selected text as superscript. |
 |
Subscript: Click on this icon to format the selected text as subscript. |
 |
Strikethrough: Click on this icon to format the selected text with a strikethrough. |
 |
Add Image: Click on this icon to add an image. |
 |
Add Alternative Text: Select an image in the text and click on this icon to add an alternative text (image caption). |
 |
Text Direction From Left To Right: Click on this icon to format the selected text from left to right. |
 |
Text Direction From Right To Left: Click on this icon to format the selected text from right to left. |
 |
Revert Changes: Click on this icon to undo your changes to the text. |
 |
Repeat: Click on this icon to repeat your changes to the text after you have reverted them. |
 |
Delete Formatting: Click on this icon to remove the formatting from the selected text. |
 |
Insert Table: Click on this icon to insert a table into the text. |

You have created an additional information for an item. The All setting under the Area column means that the additonal information is displayed in all business areas (in purchase, sales and service documents). Below you can see the display of an additional information for an item on a sales quote line.

For more information on how to deactivate an additonal information, please refer to the chapter Mark Additional Information as completed.