Create Attribute
This chapter describes how to create an attribute to record or manage additional data of a service item.
Thanks to the 7 different attribute types, you can maintain a wide range of information about service items.
Click on the data type to quickly navigate to the description.
| Attribute Type | Description |
|---|---|
| Option | The Option attribute type is used to create an attribute that provides a fixed choice of attribute values. For example, you can define this attribute type to specify the service item color and preset the attribute values Blue, Black, or Yellow. You can subsequently add additional option values for this attribute. For more information on how to add values to an attribute of the option data type, see the Create Option Attribute section. |
| Text | The Text attribute type is used to create an attribute that allows a text to be entered as a value. For example, this can be the manufacturer of a vehicle or machine. |
| Integer | The attribute type Integer is used to create an attribute that is stored with an integer value. This can be, for example, the status of the operating hours counter or the odometer reading of the vehicle. |
| Decimal | The attribute type Decimal is used to create an attribute that is stored with a decimal value. For example, you can store filling quantities (e.g. oil quantities) of the service item (the vehicle or machine). |
| Date | The attribute type Date is used to create an attribute that is stored with a date value. This can be, for example, the year of manufacture of the machine or the first registration of the vehicle. |
| Blob | The Blob attribute type is used when large amounts of data are to be stored. For example, you can use this attribute type to store a long descriptive text. |
Create Option Attribute
To create an attribute of the Option type, proceed as follows:
- From the role center, open the search function (ALT+Q).
- Search for Attribute and click on the corresponding search result.
- The Attributes page is displayed. On this page you will find all the configured attributes.
- To create a new attribute, click New in the menu bar.
- A new window is displayed.
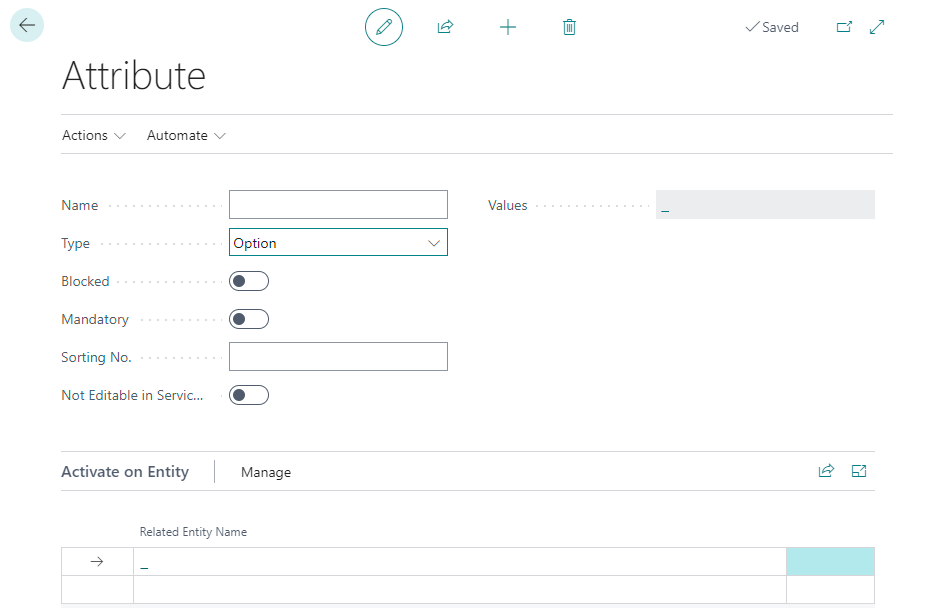
Figure: Create Attribute - Enter a name for the attribute in the Name input field.
- In the Type field, define the Option data type.
- To create the available selection values for the attribute, click in the Values field.
- Click New in the menu bar to create a selectable option for the attribute. Return to the Attribute page when you have added all the options.
- The Blocked slider is used to prevent the attribute from being used (for example, if the attribute values are not yet or no longer complete).
- Activate the Mandatory slider if you want to set that the data for this attribute must be filled on the service item.
- In the Sorting No. input field, specify a value for the sorting order of the attribute. You can specify positive and negative numbers in this field.
- Activate the Not editable in ServiceApp to restrict users of the ServiceApp to change values of the attribute.
- Under the Activate on Entity section, you can assign the created attribute to an entity. You can assign the attribute to items, assets and service items. Depending on which assignment you have made, the attribute is displayed in the attribute area in the info box area.

Figure: Assign Entity
Note
Sorting Order
The sorting order of the displayed attributes in the service item factbox depends on the specified number values in the Sorting No. field. For example, a negative value (e.g. -1) ensures that the attribute is displayed before all other attributes with positive sort order. For more information on sort order, see the Change Sorting Order for Attributes chapter.
You have created an attribute. If your coleagues use the web client in different display languages, you can store translations for the attributes and attribute values. For more information on how to add the translations for attributes and attribute values, see the Add translations chapter.
Create Text Attribute
To create an attribute of type Text, proceed as follows:
- From the role center, open the search function (ALT+Q).
- Search for Attribute and click on the corresponding search result.
- The Attributes page is displayed. On this page you will find all the configured attributes.
- To create a new attribute, click New in the menu bar.
- A new window is displayed.
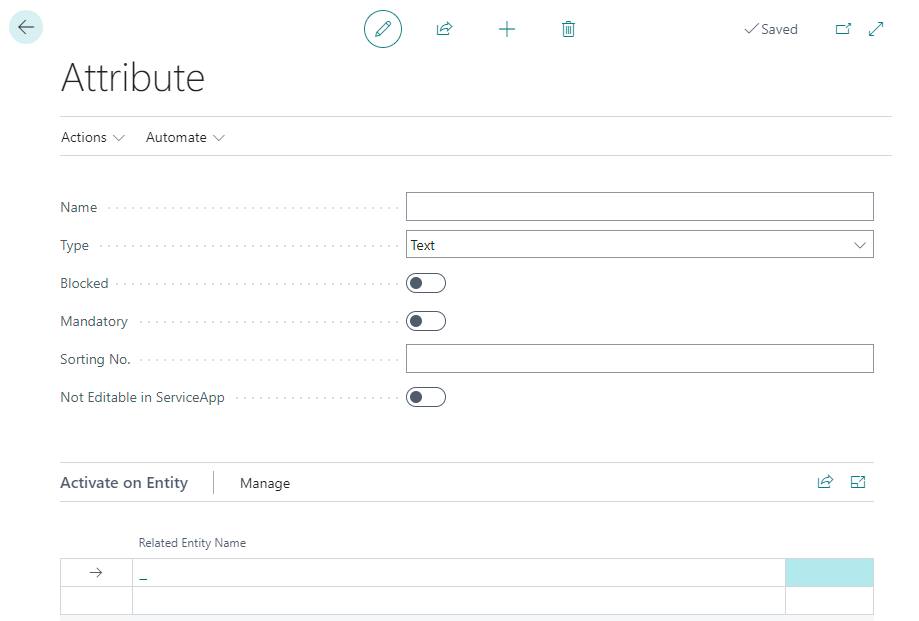
Figure: Create Attribute - Enter a name for the attribute in the Name input field.
- Define the data type Text in the Type field. The Blocked slider is used to prevent the attribute from being used (for example, if the attribute values are not yet complete or are no longer complete).
- Activate the Mandatory slider if you want to set that the data for this attribute must be filled on the service item.
- In the Sorting No. input field, specify a value for the sorting order of the attribute. You can specify positive and negative numbers in this field.
- Activate the Not editable in ServiceApp to restrict users of the ServiceApp to change values of the attribute.
- Under the Activate on Entity section, you can assign the created attribute to an entity. You can assign the attribute to items, assets and service items. Depending on which assignment you have made, the attribute is displayed in the attribute area in the info box area.

Figure: Assign Entity
Note
Sorting Order
The sorting order of the displayed attributes in the service item factbox depends on the specified number values in the Sorting No. field. For example, a negative value (e.g. -1) ensures that the attribute is displayed before all other attributes with positive sort order. For more information on sort order, see the Change Sorting Order for Attributes chapter.
You have created an attribute. If your coleagues use the web client in different display languages, you can store translations for the attributes and attribute values. For more information on how to add the translations for attributes and attribute values, see the Add translations chapter.
Create Integer Attribute
To create an attribute of type Integer, proceed as follows:
- From the role center, open the search function (ALT+Q).
- Search for Attribute and click on the corresponding search result.
- The Attributes page is displayed. On this page you will find all the configured attributes.
- To create a new attribute, click New in the menu bar.
- A new window is displayed.
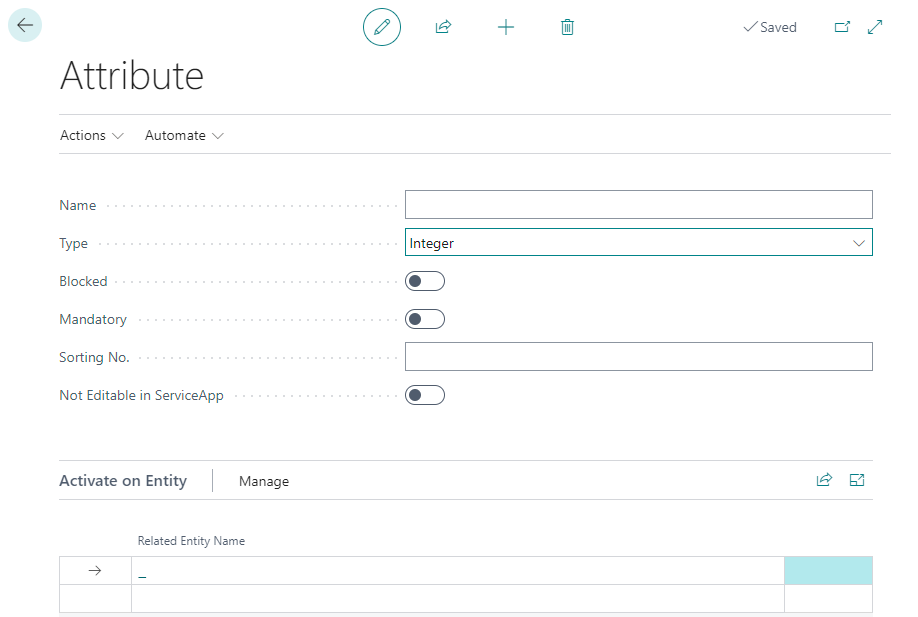
Figure: Create Attribute - Enter a name for the attribute in the Name input field.
- Define the data type Integer in the Type field. The Blocked slider is used to prevent the attribute from being used (for example, if the attribute values are not yet complete or are no longer complete).
- Activate the Mandatory slider if you want to set that the data for this attribute must be filled on the service item.
- In the Sorting No. input field, specify a value for the sorting order of the attribute. You can specify positive and negative numbers in this field.
- Activate the Not editable in ServiceApp to restrict users of the ServiceApp to change values of the attribute.
- Under the Activate on Entity section, you can assign the created attribute to an entity. You can assign the attribute to items, assets and service items. Depending on which assignment you have made, the attribute is displayed in the attribute area in the info box area.

Figure: Assign Entity
Note
Sorting Order
The sorting order of the displayed attributes in the service item factbox depends on the specified number values in the Sorting No. field. For example, a negative value (e.g. -1) ensures that the attribute is displayed before all other attributes with positive sort order. For more information on sort order, see the Change Sorting Order for Attributes chapter.
You have created an attribute. If your coleagues use the web client in different display languages, you can store translations for the attributes and attribute values. For more information on how to add the translations for attributes and attribute values, see the Add translations chapter.
Create Decimal Attribute
To create an attribute of the Decimal (decimal number) type, proceed as follows:
- From the role center, open the search function (ALT+Q).
- Search for Attribute and click on the corresponding search result.
- The Attributes page is displayed. On this page you will find all the configured attributes.
- To create a new attribute, click New in the menu bar.
- A new window is displayed.
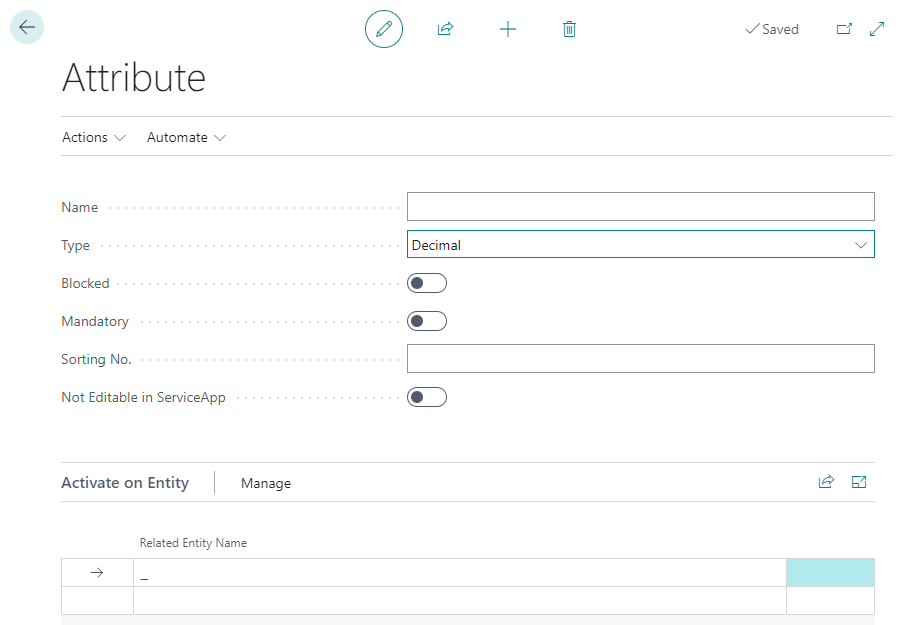
Figure: Create Attribute - Enter a name for the attribute in the Name input field.
- Define the data type Decimal in the Type field. The Blocked slider is used to prevent the attribute from being used (for example, if the attribute values are not yet complete or are no longer complete).
- Activate the Mandatory slider if you want to set that the data for this attribute must be filled on the service item.
- In the Sorting No. input field, specify a value for the sorting order of the attribute. You can specify positive and negative numbers in this field.
- Activate the Not editable in ServiceApp to restrict users of the ServiceApp to change values of the attribute.
- Under the Activate on Entity section, you can assign the created attribute to an entity. You can assign the attribute to items, assets and service items. Depending on which assignment you have made, the attribute is displayed in the attribute area in the info box area.

Figure: Assign Entity
Note
Sorting Order
The sorting order of the displayed attributes in the service item factbox depends on the specified number values in the Sorting No. field. For example, a negative value (e.g. -1) ensures that the attribute is displayed before all other attributes with positive sort order. For more information on sort order, see the Change Sorting Order for Attributes chapter.
You have created an attribute. If your coleagues use the web client in different display languages, you can store translations for the attributes and attribute values. For more information on how to add the translations for attributes and attribute values, see the Add translations chapter.
Create Date Attribute
To create an attribute of the Date type, proceed as follows:
- From the role center, open the search function (ALT+Q).
- Search for Attribute and click on the corresponding search result.
- The Attributes page is displayed. On this page you will find all the configured attributes.
- To create a new attribute, click New in the menu bar.
- A new window is displayed.
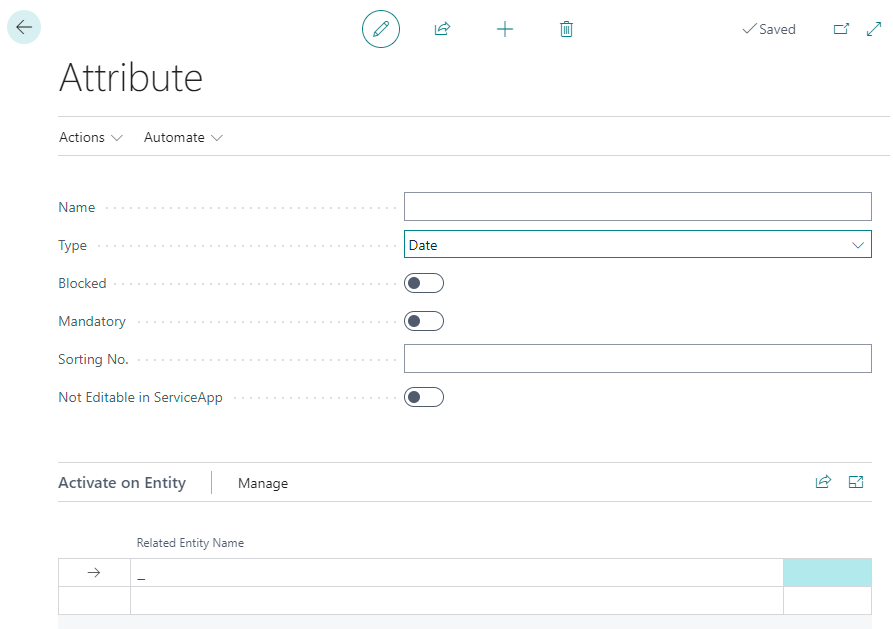
Figure: Create Attribute - Enter a name for the attribute in the Name input field.
- Define the data type Date in the Type field. The Blocked slider is used to prevent the attribute from being used (for example, if the attribute values are not yet complete or are no longer complete).
- Activate the Mandatory slider if you want to set that the data for this attribute must be filled on the service item.
- In the Sorting No. input field, specify a value for the sorting order of the attribute. You can specify positive and negative numbers in this field.
- Activate the Not editable in ServiceApp to restrict users of the ServiceApp to change values of the attribute.
- Under the Activate on Entity section, you can assign the created attribute to an entity. You can assign the attribute to items, assets and service items. Depending on which assignment you have made, the attribute is displayed in the attribute area in the info box area.

Figure: Assign Entity
Note
Sorting Order
The sorting order of the displayed attributes in the service item factbox depends on the specified number values in the Sorting No. field. For example, a negative value (e.g. -1) ensures that the attribute is displayed before all other attributes with positive sort order. For more information on sort order, see the Change Sorting Order for Attributes chapter.
You have created an attribute. If your coleagues use the web client in different display languages, you can store translations for the attributes and attribute values. For more information on how to add the translations for attributes and attribute values, see the Add translations chapter.
Create Blob Attribute
To create an attribute of type Blob (Binary Large Object), proceed as follows:
- From the role center, open the search function (ALT+Q).
- Search for Attribute and click on the corresponding search result.
- The Attributes page is displayed. On this page you will find all the configured attributes.
- To create a new attribute, click New in the menu bar.
- A new window is displayed.
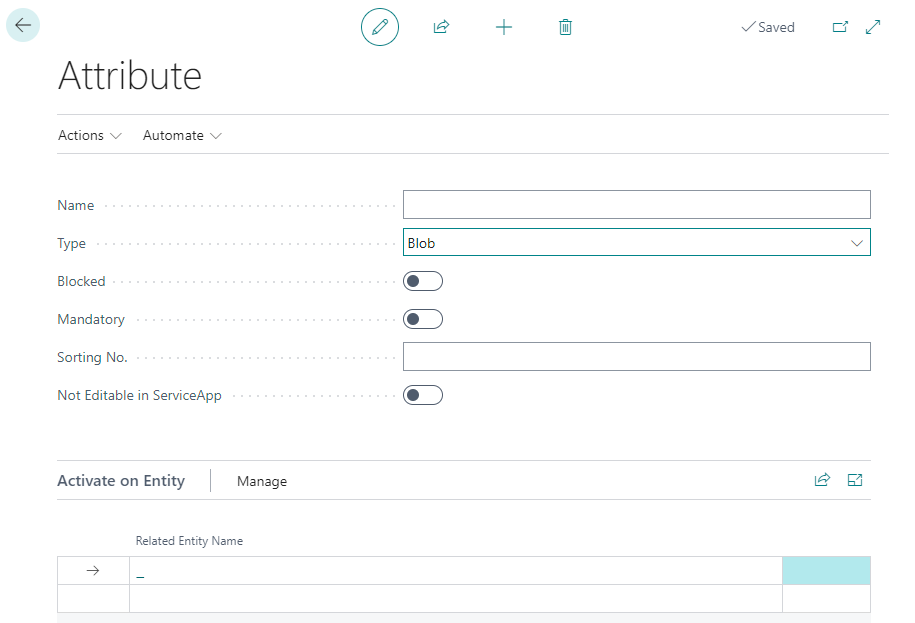
Figure: Create Attribute - Enter a name for the attribute in the Name input field.
- Define the data type Blob in the Type field. The Blocked slider is used to prevent the attribute from being used (for example, if the attribute values are not yet or no longer complete).
- Activate the Mandatory slider if you want to set that the data for this attribute must be filled on the service item.
- In the Sorting No. input field, specify a value for the sorting order of the attribute. You can specify positive and negative numbers in this field.
- Activate the Not editable in ServiceApp to restrict users of the ServiceApp to change values of the attribute.
- Under the Activate on Entity section, you can assign the created attribute to an entity. You can assign the attribute to items, assets and service items. Depending on which assignment you have made, the attribute is displayed in the attribute area in the info box area.

Figure: Assign Entity
Note
Sorting Order
The sorting order of the displayed attributes in the service item factbox depends on the specified number values in the Sorting No. field. For example, a negative value (e.g. -1) ensures that the attribute is displayed before all other attributes with positive sort order. For more information on sort order, see the Change Sorting Order for Attributes chapter.
You have created an attribute. If your coleagues use the web client in different display languages, you can store translations for the attributes and attribute values. For more information on how to add the translations for attributes and attribute values, see the Add translations chapter.